Send the front and reverse
sides of a card as a single page, without the need to send each
side separately.
.png)
Tap the [Others] key, and tap the [Card Shot] key.
Tap the [On] key, and specify the original size as required.
After the settings are completed, tap .
.
Place a card face down on the document glass.
DOCUMENT GLASS_card(dspf).png)
Tap the [Start] key, and scan the front side.
After scanning, an informational message will appear indicating whether to continue scanning the reverse side or to end scanning. If you tap the [Read-End] key, transmission will begin.Place a card face up on the document glass, and tap the [Start] key to scan the reverse side.
Tap the [Read-End] key.
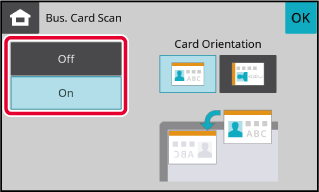
You can scan a business card.
Place one business card that you want to scan on the document glass.
DOCUMENT GLASSKeep the auto document feeder open, not closed.
If you scan the business card with the auto document feeder closed, it will not be possible to detect the outlines of the business card and scanning will fail. Always use this function with the auto document feeder open. If a light source such as an electric light shines onto the originals during scanning, cropping may not be successful. Adjust the angle of the automatic document feeder so that the light source does not affect the image.Caution
Do not look directly at the light during scanning.Specify the destination.
RETRIEVING A DESTINATION FROM AN ADDRESS BOOKTap the [Others] key, and tap the [Bus. Card Scan] key.
Tap the [On] key, and change settings as needed.
When you have completed the settings, tap .
.
Tap the [Colour Start] or [B/W Start] key to start scanning the originals.
When scanning is completed, place the next group of originals and tap the [Colour Start] or [B/W Start] key.When this function is enabled, margins (void
areas that are not scanned) are created around the edges of the
machine's
maximum scanning area.
Void area: 2.5 mm (7/64") from the top, bottom, left, and
right edges
Place the original.
Place the original in the document feeder tray of the automatic document feeder, or on the document glass.Specify the destination.
RETRIEVING A DESTINATION FROM AN ADDRESS BOOKTap the [Others] key, and tap the [Void Area] key.
A checkmark appears on the icon.Tap the [Colour Start] or [B/W Start] key to start scanning the originals.
Use this function when you wish to scan
thin originals using the automatic document feeder. This function
helps prevent thin originals from misfeeding.
.png)
Place the original in the document feeder tray of the automatic document feeder.
Adjust the original guides slowly.Specify the destination.
RETRIEVING A DESTINATION FROM AN ADDRESS BOOKTap the [Others] key, and tap the [Slow Scan Mode] key.
A checkmark appears on the icon.Tap the [Start] key to start scanning of the original.
A beep will sound to indicate that scanning and transmission have ended.Version 04a / bp22c25_usr_04a_en