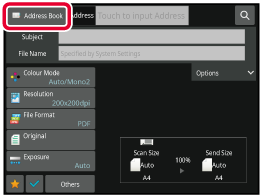
RETRIEVING A DESTINATION FROM AN ADDRESS BOOK
In the address book screen,
simply tap the one-touch key of a registered destination to retrieve
the destination.
If necessary, store multiple destinations in a one-touch key.
Tapping the key will retrieve all the stored destinations.
The address book screen shows all destinations used in each
mode. Each one-touch key shows the name of the destination and an
icon indicating the mode used for the destination.
|

|
Fax
|
|

|
Scan to E-mail
|
|

|
Internet Fax
|
|

|
Direct SMTP
|
|

|
Scan to FTP
|
|

|
Scan to Network Folder
|
|

|
Scan to Desktop
|
|

|
Group key with multiple destinations
|
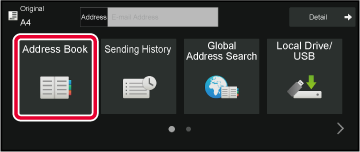
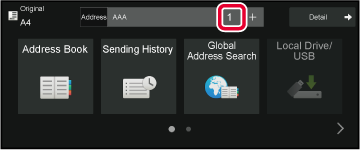
Tap the [Address Book] key.
In Normal modeIn Easy mode
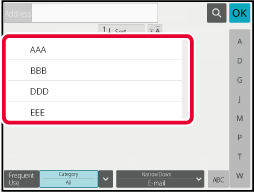
Tap the one-touch key of contact or group that has a
destination.
- The destinations
displayed on the list can be narrowed with categories, frequent
use, indexes, and keywords. (In normal mode you can narrow down
by job type.)
- Tapping the [Sort]
key allows you to change the order of destinations displayed in
the list.
- When adding a destination,
tap another one-touch key.
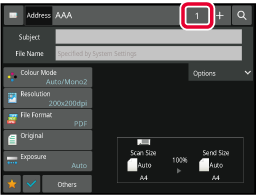
- If two or more destinations
are selected or specified, the total number of addresses appears
next to address.
- Even if only a single
destination is selected, the number of addresses appears when the
destination is a contact or group in which multiple addresses are
stored.
- For more information,
see "
ADDRESS BOOK SCREEN".
- If
you select an incorrect destination:
Tap the
key again to cancel the selection.
- To cancel
a specified destination:
Select
the address you want to cancel in the address list screen, and tap
the [Delete] key.
- To
select a destination from the transmission log, tap the [Sending History]
key.
USING A TRANSMISSION LOG TO RESEND
- To check the entered destinations, tap
the [Address Review] key.
VIEWING A LIST OF THE SELECTED DESTINATIONS
- The destination for transmission can be
selected by tapping a stored destination.
- If an
address that you do not have permission to use is included in the
addresses, a message will appear when you press the [Start]
key. To send only to the permitted addresses, press the [OK]
key and then the [Enter for send] key.
In Normal
mode
- Tap
the one-touch key, and then tap [Display Registered Information] on the action panel
to display the detailed information screen.
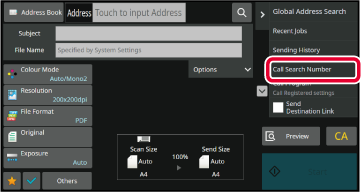
- To retrieve
a destination by using a search number, tap [Call Search Number] on the
action panel.
USING A TRANSMISSION LOG TO RESEND
- To retrieve
a destination from a global address book, tap [Global Address Search] on the
action panel.
RETRIEVING A DESTINATION FROM A GLOBAL ADDRESS BOOK
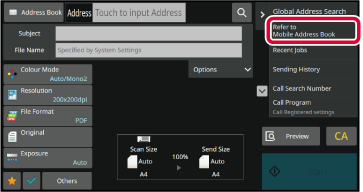
- To retrieve
a destination from the address book of the mobile device, tap [Refer
to Mobile Address Book] on the action panel.
To
enable transmission to addresses of modes other than the current
mode:
Remove the checkmark from [System Settings] → [Image Send Settings]
→ [Common Settings] → [Condition Settings] → [Address Book Default Selection] → [Apply
Addresses of Sending Modes Only] in "Settings
(administrator)".
MY ADDRESS
My Address is the user's own e-mail address,
and is the e-mail address that has been registered in the user list.
My Address can be used when login by login name / password
is enabled in user authentication.
Use this address when you want to send a scanned image to
your own e-mail address.
In E-mail mode, [Find My Address] appears on the action panel to
let you immediately find and use My Address.
When you use the address book in easy scan screen or E-mail
mode, the [Find My Address] button also appears at the top of the user
list for easy access from the address book.
- My
Address cannot be used in the following instances:
- When
address search from the user list is prohibited in the system settings
- When user
authentication is disabled, or is only by user number
- When [Apply E-mail address of the user for login.]
is enabled in [Default Address]
- When the
e-mail address of the logged in user has not been registered
- After the
[Next Address] key is pressed when [Be sure to press Next Address Key ([+]) before
selecting the next address.] is enabled in System
Settings - [Image Send Settings] → [Common Settings] → [Condition Settings]
- When [S/MIME Settings]
→ [Disable sending to the addresses which cannot be encrypted.] is enabled in the
security settings
- You can
register [Find My Address] in the home screen. This is convenient when
you frequently use My Address.
- Even if
"Verify Signature of Server Certificate of the Other Party" is enabled
in the system settings, when "Find My Address" is performed when the
search destination is an LDAP server, the server certificate of
the destination is not validated.
VIEWING A LIST OF THE SELECTED DESTINATIONS
When multiple destinations have been selected,
you can display and check the destinations. You can also delete
a destination from the list (cancel selection of the destination).
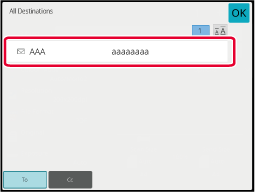
Tap the [Address Review] key.
In Normal modeIn Easy mode
Confirm the destination.
After the confirmation is completed, tap

.
To confirm detailed information such as the type
or name of the specified destination, tap the one-touch key of the
target destination, and then tap the [Info.] key.
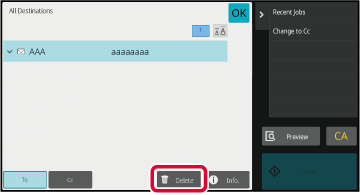
In normal mode, you can change the delivery type (To/Cc/Bcc).
Tap the address and then tap [Change to To], [Change to Cc], or [Change to Bcc]
on the action panel.
Deleting Specified Destinations
In step 2 of "VIEWING A LIST OF THE SELECTED DESTINATIONS",
select the destination and tap the [Delete] key.
If you placed the original on the document glass
and tapped the [Start] key, you cannot delete an address when
changing settings.
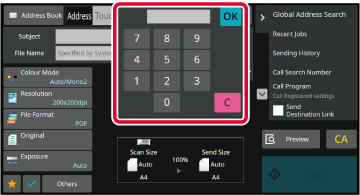
USING A SEARCH NUMBER TO RETRIEVE A DESTINATION
The search number can be used to specify
a destination stored in an address book.
Tap the [Detail] key to change to normal mode.
EASY MODETap [Call Search Number] on the action panel.
Enter a search number (4 digits) using the numeric keys
and tap
 .
.
When the search number is entered, the stored address
is retrieved and specified as a destination.
If
an incorrect search number is entered:
Tap the [C] key to clear the number and enter
the correct number.
- The
search number is programmed when the destination is stored in the
address book.
- If you
do not know the search number, tap [Print Individual List] on the action panel
to print and check the address list.
- When entering
search numbers such as "0001" and "0011", "0" can be omitted. For
example to enter "0001", enter "1" and tap the [OK] key.
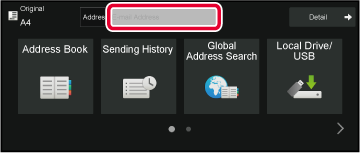
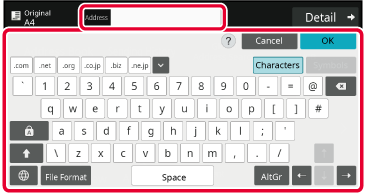
ENTERING AN ADDRESS MANUALLY
In the base screen of a mode, tap [Text Box].
On the base screen of Internet Fax, tap [Text Box] to
display the screen you want to select the address type. Tap either the
[Internet Fax] or [Direct SMTP] key.
In easy mode, only the e-mail addresses can be entered.
In Normal modeIn Easy mode
Enter the destination address on the soft keyboard that
appears.
- In
data entry mode, select the mode of the destination, and enter the
destination address.
- For Scan
to Network Folder mode, the network folder entry screen appears.
See "SPECIFYING A NETWORK FOLDER".
- After
entering the destination address, tap the [OK] key to close
the soft keyboard.
- For details on how to enter characters,
refer to "
CHARACTER ENTRY" in "How to
operate this machine".
- You can
select [Bcc] if [Image Send Settings] → [Scan Settings] → [Default Settings]
→ [Bcc Setting] → [Enable Bcc] is enabled in [System Settings].
- When you
want to display Bcc address on the job status screen or address
list tab, [Image Send Settings] → [Scan Settings] → [Default Settings] → [Bcc Setting]
→ [Display Bcc Address on the Job Status Screen] is enabled in [System Settings].
- In Internet
Fax mode, the transmission confirmation request setting screen will
appear if [System Settings] - [Image Send Settings] → [Internet Fax Settings] → [Send
Setting]
→ [I-Fax Reception Report On/Off Setting] is enabled. To request confirmation, tap
the [Set]
key. To cancel, tap the [Cancel] key. (When Direct SMTP is used,
transmission confirmation is not performed.)
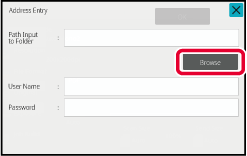
SPECIFYING A NETWORK FOLDER
Tap the [Browse] key in the network folder entry
screen.
- To
directly enter a folder, tap the [Folder Path] box. The soft keyboard
is displayed.
- If a user
name and password are required, check with the administrator of
the server and enter the user name and password.
- For
details on how to enter characters, refer to "
CHARACTER ENTRY" in "How to
operate this machine".
- If a user
authentication function other than authentication by user number
is enabled, the login name of the current user is automatically
entered in the user name field.
- If user authentication is not set and a
network folder which has different passwords for each user is selected
as the destination, a screen to enter a user name and password can
be displayed at the time of sending.
Configure in "Settings (administrator)"
→ [System Settings] → [System Control] → [Advanced Settings].
- Enter
a password with up to 255 single-byte characters.
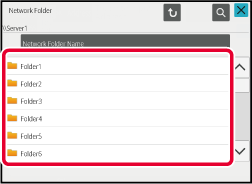
Tap the key of the workgroup that you wish to access.
- Tap
the [Search] key and enter a keyword to search for a workgroup,
server, or network folder.
- Up to
100 workgroups, 100 servers, and 100 network folders are displayed.
- Tap the
[Cancel] key to return to the screen of step 1.
Tap the key of the server or computer that you wish
to access.
If a screen appears prompting you to enter a user name
and password, check with your server administrator and enter the
appropriate user name and password.
Tap the key of the network folder.
After the settings are completed, tap the [OK]
key. You will return to the screen of step 1. Tap the [OK]
key again to accept the destination.
SELECTING A SUBFOLDER AS A DESTINATION
If there is only one shared folder selected as the destination,
tapping [Select a Subfolder] changes the destination to the subfolder.
- If the destination is changed to
a subfolder, hyperlink e-mail transmission will not take place.
- If a selected destination is a group destination,
this function cannot be used.
- If [Send and Print] of the copy function
is set, this function cannot be used.
- If [Disable Selection from Address Book]
or [Disable Direct Entry] in "Settings (administrator)" → [System
Settings] → [Device Control] → [Enable/Disable Settings] → [Settings
to Disable Transmission] is prohibited, this function cannot be used.
- If [Approval Settings for Each Mode], [Approval
Setting for Direct Entry], or [Approval Setting to Use a Local Address
Book] in "Settings (administrator)" → [System Settings] → [User
Control] → [Authority Group] is prohibited, this function cannot be
used.
RETRIEVING A DESTINATION FROM A GLOBAL ADDRESS BOOK
When an LDAP server is configured in the
"Settings (Web version)", look up an address in a global address
book and retrieve the destination address for Scan to E-mail or
Internet fax transmission (excluding Direct SMTP addresses).
In normal mode, you can add an address retrieved by searching
to the address book. However, addresses of the FTP/Desktop transmission
cannot be stored from the machine.
Even if "Verify Signature of Server Certificate
of the Other Party" is enabled in the system settings, when "Global
Address Search" is performed when the search destination is an LDAP
server, the server certificate of the destination is not validated.
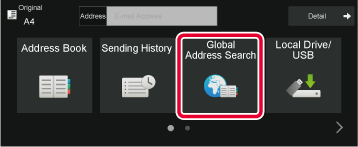
Tap the [Global Address Search] key.
In Easy mode
In the base screen or address book screen, tap [Global Address Search] on
the action panel.
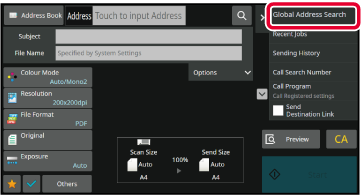
In Normal mode
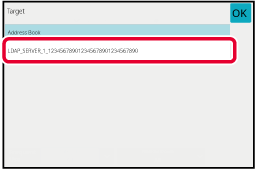
Tap [Destination] and tap the LDAP server to be used.
- If
an authentication screen for the LDAP server appears, enter your
user name and password.
- If only
one LDAP server has been stored, it is not necessary to take step
2. In this case, start from step 3.
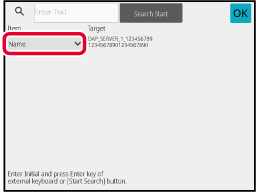
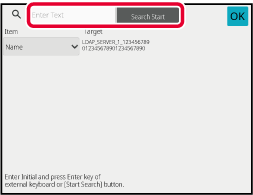
Tap
 of [Item], and select an item to be
searched from [Name] or [Address].
of [Item], and select an item to be
searched from [Name] or [Address].
How
to searchEnter the search characters (maximum of 64 characters).
The system will look for names starting with the entered letters.
An asterisk

is used as follows:
XXX
: Names beginning with "XXX"
XXX : Names that end with "XXX"
XXX
: Names containing "XXX"
AA
XX : Names that start with "AA" and end
with "XX".
Enter a keyword and tap the [Search Start] key.
When you tap the keyword entry box, the soft keyboard appears.
The search results will appear after a brief interval.
- If
no destination is found:
Tap the
[Search Again] key to add more search letters.
- To continuously
add other destination.
Tap the
destination.
To
check the destination information:Tap the one-touch key of the target destination, and
then tap the [Info.] key. Tap
to close the address information screen.
In normal mode, you can select an address and tap [New Registration with Address Book]
on the action panel to add the address to the address book. This
is convenient if you have entered a destination directly.
RETRIEVING A DESTINATION FROM A MOBILE ADDRESS BOOK
If the machine and mobile device are connected
by Bluetooth, you can retrieve a destination from the mobile address book.
Destinations for fax transmission and e-mail transmission
can be retrieved.
- The
called address book is not saved in this machine.
- The maximum number of addresses that can
be read from the mobile address book is 2000.
- For more information about the operation
of mobile devices, please refer to the operation manual/help of
the mobile device.
To
use this function
Enable
"Settings (administrator)" → [Network Settings] → [Bluetooth Setting]
→ [Bluetooth] to pair the machine and mobile device.
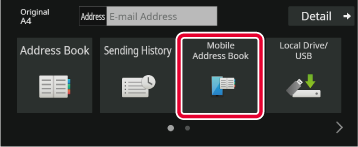
Tap the [Mobile Address Book] key.
In Easy mode
In the base screen or address book screen, tap [Refer to Mobile Address Book]
on the action panel.
In Normal mode
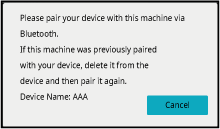
Operate the mobile device to be connected to pair it
with the machine.
Device name of the machine is displayed on the screen.
When pairing with a mobile device that has been
paired with this unit before, delete the information of this unit
stored in the mobile device.
To
set a device name to this machine
Configure in "Settings (administrator)" → [System Settings]
→ [Network Settings] → [Network Name Setting] → [Device Name].
The device name must be in 7 or less double-byte characters,
or 15 or less single-byte characters.
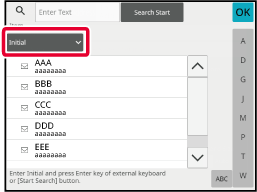
Tap (
) of [Item], and select an item to be
searched from [Initial], [Name] or [Address].
Enter a keyword and tap the [Search Start] key.
When you tap the keyword entry box, the soft keyboard appears.
The search results will appear after a brief interval.
- If
no destination is found:
Tap the [Search Again] key to add more search
letters.
- To continuously
add other destination.
Tap the destination.
USING A TRANSMISSION LOG TO RESEND
Select a destination from a transmission
log and resend the data.
The destinations of the most recent 50 transmissions by Scan
to E-mail, Internet fax (including Direct SMTP addresses), and/or
fax are stored. Select one of these to resend to that destination.
The destinations of the FTP/Desktop transmission and Scan to Network
Folder are also shown in the transmission log.
In normal mode, the addresses shown in the transmission log
can also be stored in an address book. This is convenient when storing
an address that was manually entered.
- When
a destination for retransmission is selected in the transmission
log screen, the mode of the selected destination is automatically
selected.
- The following
types of addresses are not stored for resending.
- One-touch
key for a contact or group in which multiple destinations are stored.
- Group destinations
- Broadcasting
destinations
- The user
name and password are not stored for security reasons. If a screen
requiring you to enter such information appears, enter the information
again.
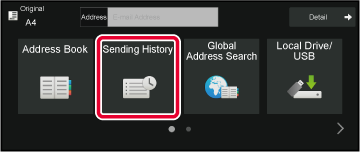
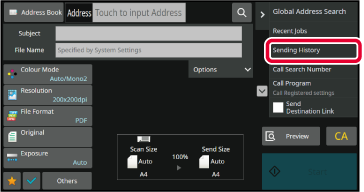
Tap the [Sending History] key
In Easy mode
In the base screen or address book screen, tap [Sending History]
on the action panel.
In Normal mode
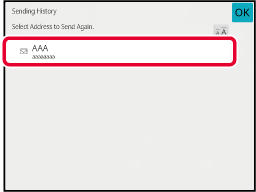
Tap the key of the destination to resend.
The last 50 addresses used for transmission are displayed.
If a screen requiring you to enter the user name and password
appears, enter the information.
To
cancel the resend setting:
Tap the highlighted key.
In normal mode, you can select an address and tap
[New Registration with Address Book] on the action panel to add the address to the
address
book. This is convenient if you have entered a destination directly.
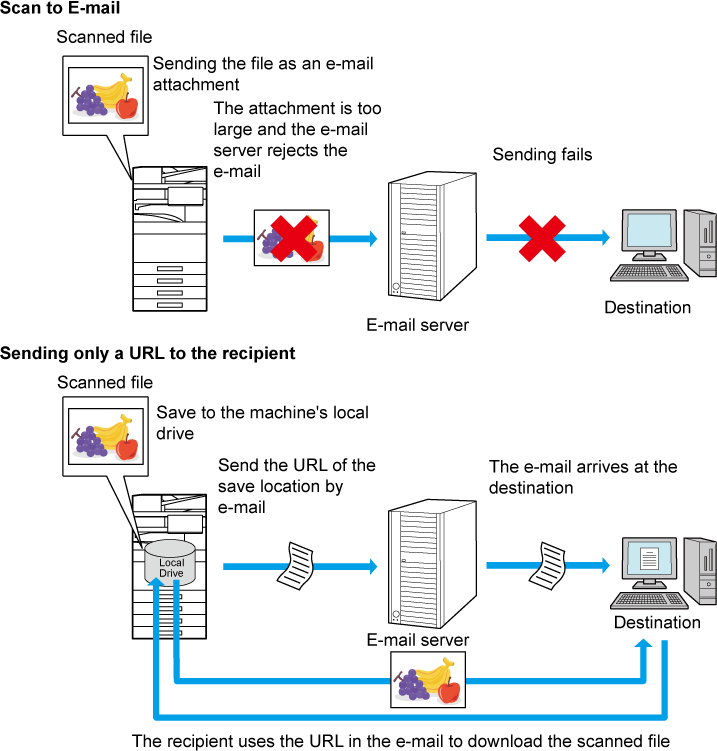
SENDING ONLY THE URL OF A SCANNED FILE TO A SCAN DESTINATION
When using Scan to E-mail, some originals
and/or scan settings may result in a large file.
When the file is large, there is a risk that the e-mail server
may reject the file and it will not be sent.
This function saves the scanned file on the machine's local
drive, and sends an e-mail providing only the file's URL information
to the recipient.
This function helps reduce the load on the e-mail server and
prevents non-delivery of scanned files caused by the e-mail server.
Upon receiving the e-mail, the recipient can use the URL in
the e-mail to download the scanned file.
When the scanned file is too large
Sending only a URL to the recipient
Using easy mode
When [Enable Send Destination Link as Default] is enabled in the settings (administrator),
the scanned data is saved in the machine's local drive, and URL
information is sent to the e-mail destination. When disabled, scanned
data is sent by regular Scan to E-mail. This function enable/disable
cannot be changed in the easy mode screen.
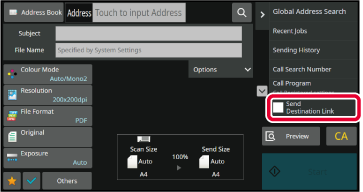
Using normal mode
[Send Destination Link] appears on the action panel of the home
screen of Scan to E-mail. By selecting this checkbox
 , you can use this function.
Number of URLs created
One URL is created per file to be downloaded.
Using [One Page per File]
Multiple scanned files will be created and saved at once,
and a URL will be created for each file and sent to the recipient.
Using [Programmed]
Files will be created and saved in a format that varies by
recipient, and a URL will be created for each file. A URL will be sent
to each recipient for the file in the format for that recipient.
- To
use this function, [Send Destination Link Settings] must be enabled in the System
Settings
(administrator).
- This function
cannot be used in combination with metadata transmission or resending
from document filing.
- If a subfolder
is selected as the saving destination, this function cannot be used.
- Scanned
files are saved in the standard folder area.
- Scanned
files cannot be browsed by a method other than downloading.
- Scanned
files cannot be manually deleted, and are retained for the save
period set in the System Settings. However, scanned files will be
deleted if Clear All Memory or Initialize Private Data/Data in Machine
is executed, or you move to Advanced Security Settings.
- When all
destinations in a broadcast transmission are e-mail addresses, URL
information is sent to all destinations.
If the file format of the saved scan data is the same for all destinations,
the same URL will be sent. If the file format varies by destination,
separate URLs will be sent.
- If the
transmission includes recipients for different jobs (Scan to FTP,
Scan to Desktop, etc.), transmission will take place by sending
only a URL to the recipient to any e-mail addresses, while the scanned
file will be sent directly in the normal way to recipients for other
jobs.
- When [Document Administration Function]
is enabled in the System Settings (administrator), the scanned file
will be sent directly to the administrator, not by URL.
- Even when
[Send Destination Link Settings] is disabled in the System Settings (administrator),
the URL can be accessed and the scanned file downloaded during the
file save period.
- The scanned
file will be saved even if a send data limit is set in the System
Settings (administrator) and the file exceeds the limit. The scanned
file will be saved as a single file even if [If the send data exceeds maximum size,
it will be sent in multiple files.] is enabled
in the System Settings (administrator) and the file exceeds the
limit.
If there is a job other than a Scan to E-mail job in a broadcast
transmission and the scanned file exceeds the [Maximum Size of Send Data (FTP/Desktop/Network
Folder)] setting,
transmission will not be possible.
-
To use this function
Configure in "Settings (administrator)"
→ [System Settings] → [Image Send Settings] → [Scan Settings] →
[Condition Settings] → [Send Destination Link Settings].
- To always
use this function in easy mode
Configure in "Settings (administrator)"
→ [System Settings] → [Image Send Settings] → [Scan Settings] →
[Condition Settings] → [Enable Send Destination Link as Default].
When this function is enabled and e-mail is sent in normal mode,
the [Send Destination Link] checkbox in the action panel is always
.
- Save period
for scanned files saved using this function
Configure in "Settings (administrator)"
→ [System Settings] → [Image Send Settings] → [Scan Settings] →
[Condition Settings] → [File Retention Period].
- Protecting
the URL by SSL/TLS
Configure in "Settings (administrator)"
→ [System Settings] → [Image Send Settings] → [Scan Settings] →
[Condition Settings] → [Enable SSL/TLS].