Settings related to the printer function can be configured.
Printer condition settings are described below.
Disables to print a notice page.
Disables to print the test page.
When this setting is enabled, [Status] → [Data List]
→ [List for User] → [Printer Test Page] in "Settings" cannot be used to print
test pages.
When printing an 8-1/2" x 11" (letter) size
image, this setting allows A4 size paper to be used if 8-1/2" x
11" size paper is not loaded. In addition, when printing an A4 size
image, this setting allows 8-1/2" x 11" (letter) size paper to be
used if A4 size paper is not loaded.
When printing 11" x 17" (ledger) size, if 11"
x 17" size paper is not loaded in the paper tray, it will be printed
on A3 paper. In addition, when printing A3 size, if A3 size paper
is not loaded in the paper tray, it will be printed on 11" x 17"
(ledger) paper.
Enable Detected Paper Size in Bypass Tray
This is used to prohibit printing when the paper size specified
for a print job is different from the paper size inserted in the
bypass tray.
Enable Selected Paper Type in Bypass Tray
This is used to prohibit printing when the paper type specified
for a print job is different from the paper type inserted in the
bypass tray.
Exclude Bypass-Tray from Auto Paper Select
When [Auto] is selected for paper type selection, the
bypass tray is excluded from the trays that can be selected. This
is recommended when special paper is often placed in the bypass
tray.
When this function is enabled, received print
jobs are displayed in the spool queue of the job status screen.
The jobs are moved to the job queue after they have been analyzed
by the machine.
Multiple jobs that have not yet been analyzed appear in the spool
queue.
When this function is disabled, received print jobs are displayed
in the job queue instead of being displayed in the spool queue.
However, when an encrypted PDF job is printed, the job appears in
the spool queue.
Disables the function for directly printing
of a file in a USB memory device.
Disables the direct printing from a network
folder.
Disables the Image Send function during printing.
Settings related to the printer function can be configured.
These settings are used to control and monitor data transmitted
to the USB port or network port of the machine.
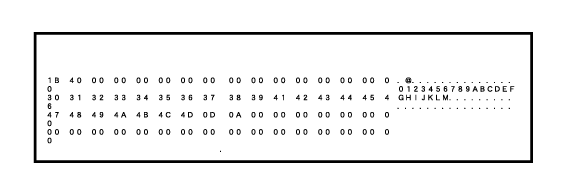
This function is used to print the print data
from a computer in hexadecimal format together with the corresponding ASCII
text. This mode allows you to check whether or not print data from
the PC is being transmitted to the printer correctly.
The I/O timeout can be set to any number of
seconds from 1 to 999.
The I/O timeout function temporarily breaks the connection
if the set duration of time elapses without any data being received
by the port. After the connection is broken, the port is set to
auto selection or the next print job is begun.
Enables printing from the network port.
This setting is used to select the emulated
printer language when the machine is connected by a network port.
The following settings can be configured.
Auto
PostScript
PCL
Selects when port switching takes place.
If you print data in an environment where the printer
driver is not used (that is, if you print data using the MS-DOS system
or if you print data using the PC that does not have the provided
printer driver installed), set the detailed printing conditions.
(However, the "Disable Blank Page Print" function will be effective
even when the PCL printer driver is used.)
| Setting item | Description |
|---|---|
|
Copies |
1 - 9999 sets |
|
Orientation |
Portrait Landscape
|
|
Paper Size |
Set the default paper size.
|
|
Output tray |
Set the default delivery tray.
|
|
Paper Type |
Set the default paper type.
|
|
Resolution Setting |
600dpi 600dpi (High Quality) 1200dpi
|
|
Disable Blank Page Print |
|
|
Duplex printing |
1-Sided 2-Sided (Booklet) 2-Sided (Tablet)
|
|
N-Up Printing *1 |
N-Up 1-Up 2-Up 4-Up 8-Up
|
|
Layout Left To Right*2 Right To Left*2 Upper-Left To Right*3 Upper-Left To Lower*3 Upper-Right To Left*3 Upper-Right To Lower*3
|
|
|
Fit To Page*4 |
|
|
Output |
|
|
Separator Page |
|
|
Staple Sort*5 |
None, 1 Staple at Back, 2 Staples, 2 Staples (Top), Stapleless Staple*6
|
|
Punch*7 |
|
|
Fold*8 |
|
|
Fold*9 |
Set the paper folding.
|
|
Saddle Fold*9 |
Set the saddle fold.
|
|
Paper Size for Z-Fold *9 |
Select the paper size to use for Z-Fold.
|
|
C-Fold*9 |
Set the print surface and opening method for C-Fold.
|
|
Accordion Fold *9 |
Set how to open accordion fold.
|
|
Double Fold*9 |
Set the print surface and opening method for Double Fold.
|
|
Half Fold*9 |
Set the print surface and opening method for half fold.
|
|
Trimming Width Settings *10 |
Sets the cutting width. |
|
Quick File |
|
*1 Paper sizes that can be used with this function are A3, B4, A4, 11" x 17", 8-1/2" x 14", and 8-1/2" x 11". (This function may not take effect with some print methods.)
*2 Can be selected when 2-Up is selected.
*3 Can be selected when 4-Up/8-Up is selected.
*4 Only effective when printing PDF, JPEG, and TIFF files.
*5 It can be used by connecting a finisher, or saddle stitch finisher.
*6 When the saddle stitch finisher (large stacker) or finisher (large stacker) is installed.
*7 When a punch module is installed.
*8 When the saddle stitch finisher or saddle stitch finisher (large stacker) is installed.
*9 When the folding unit is installed.
*10 When the trimming module is installed.
This is used to set the symbol sets, fonts, and line feed code used
in a PCL environment.
| Setting item | Settings |
|---|---|
|
PCL Symbol Set Setting |
Specify the symbol set used for printing.
|
|
PCL Font Setting |
Select a font used for printing.
|
|
PCL Line Feed Code |
This setting is used to select how the printer responds when a line feed command is received.
|
|
Wide A4 |
When this is enabled, 80 characters per line are printed on the 8-1/2" x 11" (A4) size paper using a 10-pitch font. (When this setting is disabled, up to 78 characters are printed per line.)
|
When an error occurs during PostScript printing, these
settings determine whether or not an error notice is printed and whether
or not the PostScript data is received in binary format.
| Setting item | Settings |
|---|---|
|
Screen Settings |
Configure image settings for PostScript.
|
|
Print PS Errors |
When a PS (PostScript) error occurs during PostScript printing, this setting determines whether or not an error notice is printed.
|
|
Binary Processing |
Receive PostScript data in binary format.
|
When you print an Excel file directly, select the sheet for
which you want to print or the entire workbook of the file.
Sets the use of print releases.
When [Enable] is selected, [Print and Delete the Data] is enabled in
the print screen of the print release job.
Set the print order from the oldest date, or from the
data list number.
Sets the communication timeout used in the print release.
Set the multifunction device that saves the print release
job to [Primary Unit].
Select whether or not stored print release jobs are
automatically deleted after a set time elapses.
If you select [Enable], jobs that have been stored the number
of days set in "Days" will be automatically deleted.
Enter a code for authentication between the primary
unit and secondary unit. Maximum of 32 alphanumeric characters.
Set the port number used for print release in the primary
unit and in the secondary unit. Be sure to set the same number in
both the primary unit and the secondary unit. (The default port
number is "53000", and there is no particular need to change this.)
When the machine functions as the primary unit, select
this to delete all stored print release jobs.
Enter the addresses of the Primary Unit 1 to the Primary
Unit 3.
Enter a code for authentication between the primary
unit and secondary unit. Maximum of 32 alphanumeric characters.
Set the port number used for print release in the primary
unit and in the secondary unit. Be sure to set the same number in
both the primary unit and the secondary unit. (The default port
number is "53000", and there is no particular need to change this.)
You can increase the number of groups by using the extension.
Select the group to be used in groups 1-10.
You can set the selected group as the default group for use
in print releases. It is convenient to set a frequently used group
because it will always be set to the selected group.
Set the group to connect to.
Use This Group
When [Enable] is selected, [Use This Group] is set on the
print screen of the print release job.
Set the address, connection code, and port number of
the base unit 1 to base unit 3 used in the group.
Select this option to use the E-mail printing.
Set whether or not E-mail print is performed.
Set the POP3 server used for E-mail.
Set the port number of the E-mail server.
Specify the authentication method for POP.
Select "OAuth 2.0" when using Microsoft365, Exchange Online,
etc.
For information on how to configure the settings when OAuth
2.0 is selected, see "
OAuth 2.0 AUTHENTICATION".
This can be set when "OAuth 2.0" is selected
as "Authentication Method".
Select a provider.
This can be set when "OAuth 2.0" is selected
as "Authentication Method".
Enter an account name.
This can be set when "OAuth 2.0" is selected
as "Authentication Method".
Displays the current token status.
The "Get Token" key is displayed if the token
has not been obtained, and the "Delete" key is displayed if the
token has been obtained.
This setting is available when you select "Authentication
Method" other than "OAuth 2.0".
Set the E-mail user name.
This setting is available when you select "Authentication
Method" other than "OAuth 2.0".
Set the password used for E-mail.
Set the automatic e-mail check frequency (polling
interval).
Use when SSL/TLS is used.
Configure these settings if you will be printing files
on an FTP server by direct print.
A list of available FTP servers is shown. To add an FTP server,
click the [Add] button and configure the settings.
Configure FTP server settings.
Set the name to be used for direct print.
Set the name of the FTP server.
Set the port number of the FTP server.
Set the directory of the FTP server that has the files.
Set the user name used to log in to the FTP server.
Set the password used to log in to the FTP server.
Enable SSL/TLS
Set to use PASV mode.
Configure these settings if you will be printing files
on a network folder by direct print.
A list of available network folders is shown. To add a network
folder, click the [Add] button and configure the settings.
Configure network folder settings.
Set the name to be used for direct print.
Set the folder path that has the files.
Set the user name used to log in to the network folder.
Set the password used to log in to the network folder.
Configure these settings to print files on a computer
or mobile terminal by direct print.
Specify whether or not FTP print settings are
used for direct print.
Enter the port number used for direct print.
Print from the network using the IPP protocol
without using a printer driver.
You can set the location information of this
machine.
Version 04a / bp70m90_usr_04a_en

 (Enabled)
 (Disabled)