USING THE PRINT RELEASE FUNCTION
This section explains how to store jobs in the primary unit, and how to select and
print jobs from a secondary unit.
If "Restrict Print Jobs" is enabled in the system settings and the function used is
"Document Filing", the print release function cannot be used.
In addition, when the restriction action of "Restrict Print Jobs" is [Force Retention],
even if print release is specified in the printer driver, the job will be saved in
document filing.
Also, if the restriction action of "Restrict Print Jobs" is [Disable Jobs except Print
Hold] and print release is specified in the printer driver, the printer job will be
canceled.
STORING A JOB IN THE PRIMARY UNIT FROM YOUR COMPUTER
When user authentication enabled in the machine, you must enter your user information
(login name, password, etc.) in the settings screen of the printer driver in order
to print.*For explanations of the settings, see "PRINTER FUNCTION".
* The user information that is required varies depending on the enabled authentication
method. Check with the machine administrator for this information.
- Check the paper size and paper type used for printing.
- Select a paper size and paper type that are supported by the machine to be used.
- If you select a non-supported paper size or paper type, you may not be able to print.
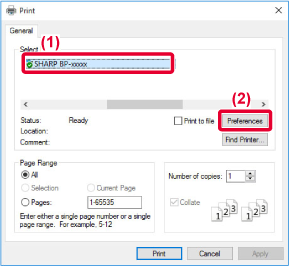
In a Windows environment
Open the printer driver properties window.
- Select the printer driver of the Primary Unit.
- Click the [Preferences] button.
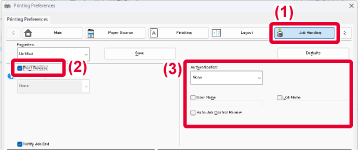
Configure the print release function.
- Click the [Job Handling] tab.
- Select the [Print Release] checkbox
 .
.
- Enter user information as needed.
For more information, see "Authentication Settings".
- The print release function cannot be used at the same time as the document filing
function.
- You can change the number of copies at the time of printing.
- If less than 10 MB is free in the storage area of the primary unit, the job will not
be stored. Delete unneeded jobs and print again.
Select any print settings that are needed, and click the [OK] button.
Start printing.
In a macOS environment
In the application, select [Print] from the [File] menu. Make sure that the machine's
printer name is selected.
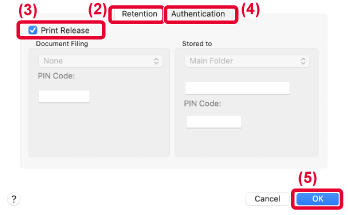
Configure the print release function.
- Select [Job Handling] from the "Printer Options".
In macOS 12 and earlier, select [Job Handling].
- Select [Retention].
- Select the [Print Release] checkbox
 .
.
- Select [Authentication] and enter your user information as needed.
If user authentication is not enabled, this step can be omitted.
For more information, see "Authentication Settings".
- Select any other print settings that are needed, and click the [OK] button.
- The print release function cannot be used at the same time as the document filing
function.
- You can change the number of copies at the time of printing.
- If less than 10 MB is free in the storage area of the primary unit, the job will not
be stored. Delete unneeded jobs and print again.
Start printing.
PRINTING/DELETING A JOB STORED IN THE PRIMARY UNIT FROM A SECONDARY UNIT
This section explains how to print and delete a stored job from a secondary unit.
Tap the [Print Release] key on the Home screen.
- A list of the jobs stored in the primary unit appears.
- If the power of the primary unit is not on, a message will appear and you will not
be able to view the stored jobs.
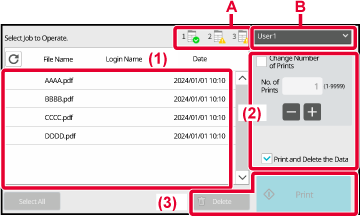
Print or delete the selected job.
- Tap the job you want to print or delete. The checkbox is selected
 .
. You can select more than one job.
You can select all jobs with the [Select All] key.
- Configure print settings.
To delete the job from the primary unit after printing, select the [Print and Delete
the Data] checkbox. (This step is no necessary when only deleting the job.)
- Start printing or deleting.
If you are deleting the job, a confirmation screen will appear. Select [Yes] to delete.
A: Machine iconThe communication status with the primary unit is displayed. By tapping the machine
icon, detailed information is displayed.
The number shown in the machine icon indicates the number of the primary unit.
B: Pull-down menuAppears when the Machine group collaboration function is used. By selecting another
Machine group in this pull-down menu, the print jobs of the other Machine groups are
displayed.
When user authentication is enabled, only the print jobs of the logged-in user appear.
- If you selected a setting that cannot be executed because the secondary unit does
not have the necessary option, the setting will be disregarded.
- If the selected job is a PS file, the job will only be printed if the secondary unit
supports PS file printing.
- To create print release icons on the home screen and allocate a group of print releases
to each, a list of jobs in each group can be displayed with a one-touch operation.