SHARP

Language

FORWARDING RECEIVED DATA

FORWARDING RECEIVED FAXES (FAX DATA RECEIVE/FORWARD (MANUAL))

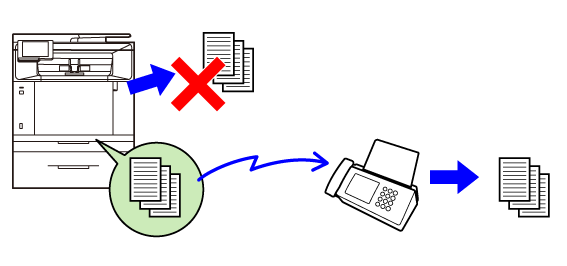
When the machine cannot print because it is out of paper or out of toner, received faxes can be forwarded to another previously stored fax machine. Store a recipient by selecting [ Send Setting] in Setting mode.
If the machine has received data, the information indicator blinks in blue.
This function is convenient in an office or work area that has two or more telephone lines and another fax machine is connected to a different line than the machine.

  • If some pages of a fax that is being forwarded were successfully printed, only those pages that were not printed will be forwarded.
  • A forwarded fax becomes a fax transmission job. If transmission does not take place because the transmission was canceled or an error occurred, the fax will be held in memory until it can be printed.
  • All faxes received are forwarded.

Make sure that the information indicator is blinking in blue.

Tap the [Menu] icon and [Forward Received Data] to begin forwarding.

After the forwarding is completed, the received data retained in the memory of the device will be deleted.

FORWARDING RECEIVED DATA TO PRESET DESTINATIONS (INBOUND ROUTING SETTINGS)

Received fax data is automatically forwarded to the fax destination. Received data can be forwarded to the specified destinations without being printed.

Configure forwarding settings for received data in the system settings on the Web page.
The following explanation assumes that the system settings on the Web page has been accessed with administrator rights.

Whether to forward or not can be set for each forwarding table, by selecting [System Settings] → [Image Send Settings] → [Inbound Routing Settings] → [Administration Settings] → [Inbound Routing] on the web page, and then selecting [Forward Condition] for the forwarding table from [No Forwarding] or [Always Forward].
    When designating a mobile phone as the forwarding destination, we recommend that you confirm in advance that the received data is delivered to the mobile phone and can be displayed correctly, as it may not be forwarded correctly depending on the type of mobile phone.

In the Web page, click [System Settings] → [Image Send Settings] → [Inbound Routing Settings] → [Administration Settings].

In "Inbound Routing", select [Enable] and click the [Submit] button.

Use [Print Style Setting] to set whether or not to print on the device when transferring received data. After completing the settings, be sure to click the [Submit] button.
  • [Always Print]: Always prints received data before forwarding the data.
  • [Print at Error]: Prints received data only when an error prevents forwarding.

Click [Table Name] in the [Inbound Routing Settings] menu on the Web page.

Select the sender whose faxes will be forwarded.

  • To forward all received data, select [Forward All Received Data].
  • To forward only data received from a specific address, select [Forward received data from specified senders only.], select the target sender from the list, and click the [Add] button.
Enter the fax number directly or click [Add (Selecting from Address Book)] to select it as the sender number.

Select the forwarding conditions.

To always forward received data, select [Always Forward].

To add a forwarding address from the address book, click [Add (Selecting from Address Book)].

Specify multiple addresses registered from the machine's address book.
Up to 5 forwarding destinations can be registered.

To enter the forwarding address directly, click [Add (Direct Entry)].

  • Specify this information if necessary.
  • Enter an e-mail address directly and tap the [Add] key.
    When designating a mobile phone as the forwarding destination, it is recommended that you additionally designate another destination other than a mobile phone in the [Forwarding Destination Settings] in this procedure for data backup, or select [Always Print] in the [Print Style Setting].
Language

Version 03a / bpc131wd_usr_03a_en

↑Top of page