Use the bypass tray for printing on plain paper, label
sheets, tab paper, and other special media.
A maximum of 100 sheets of paper can be loaded into the bypass
tray (on the machine), or a maximum of 500 sheets can be loaded
in the bypass tray (on the large capacity trays), and continuous
printing is possible as is the case with other trays.
For detailed information on the sizes and types of paper that
can be loaded into the bypass tray, see "
SPECIFICATIONS" and "
Paper Tray Settings".
Load paper up to A5 (7-1/4" × 10-1/2") size
in landscape orientation.
| Bypass tray (on the machine) | Bypass tray (on the large capacity trays) |
|---|---|
 |
 |
When printing on tab paper, be sure to place
the paper with the print side facing down.
For the bypass tray (on the large capacity trays), the dedicated
guide must be installed in the bypass tray guides at the rear end.
The dedicated guide is in the upper side of the large capacity trays.
| Bypass tray (on the machine) | Bypass tray (on the large capacity trays) | |
|---|---|---|
|
Left |
 Place the first sheet of tab paper so that the tab faces toward you. |
 Place the first sheet of tab paper so that the tab faces toward you. |
|
Right |
 Place the first sheet of tab paper so that the tab faces away from you. |
 Place the first sheet of tab paper so that the tab faces away from you. |
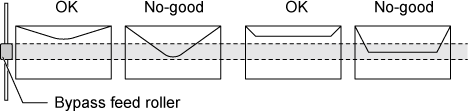
When loading envelopes into the bypass tray,
place them in the orientation as shown in the figure.
Only the front side of envelopes can be printed on or
copied to. Place the front side facing down.


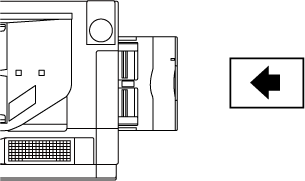
Open the bypass tray.
_open.png)
_2.png)
Caution
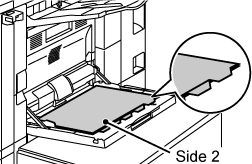
Do not place heavy objects on the bypass tray or press down on the tray.Adjust the bypass tray guides to the size of paper to be loaded.
_3.png)
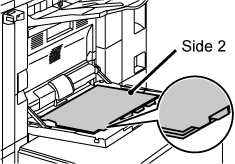
Insert the paper along the bypass tray guides all the way into the bypass tray until it stops.
Load paper with the print side facing down._4.png)
Caution
To replace the paper in the bypass tray, press the operation button and remove the paper.
The paper table goes down. The operation button blinks while the paper table goes down. The button lights up when the paper table has gone down. Do not remove the paper until the button ceases blinking.
Adjust the bypass tray guides to the size of paper to be loaded.
Grasp the guide lock lever to adjust the bypass tray guides to the paper size. Be sure to adjust the bypass tray guides at the rear end.

Caution
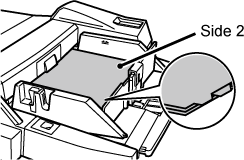
Do not place heavy objects on the bypass tray or press down on the tray.Insert the paper along the bypass tray guides all the way into the bypass tray until it stops and adjust the right-side guide.
Load paper with the print side facing down.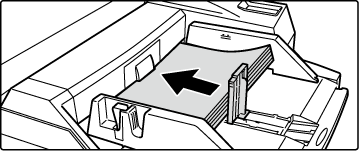
Caution
Press the operation button.
The paper table goes up. The operation button blinks while the paper table goes up. The button lights up when the paper table has gone up.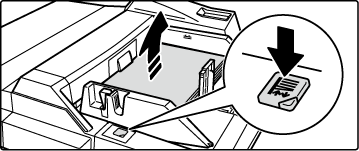
The steps for attaching the optional long
paper feeding tray to the bypass tray are explained below.
Extend the auxiliary guide of the long paper feeding tray.

Pull out the extension guide of the bypass tray.

Attach the long paper feeding tray onto the extension guide of the bypass tray.

Replace the extension guide of the bypass tray.

Version 04a / bp90c80_usr_04a_en
