An image can be sent in scan mode (Scan
to E-mail, Scan to FTP, and Scan to Network Folder).
Warning
Do not place any objects under the original size detector. Closing the automatic document feeder with an object underneath may damage the original size detector plate and prevent correct detection of the document size.Place the original.
Place the original in the document feeder tray of the automatic document feeder, or on the document glass.-2.png)
 ). If placed in landscape (horizontal) orientation
(
). If placed in landscape (horizontal) orientation
( ), an incorrect size will be detected.
For an 5-1/2" x 8-1/2"R (A5R) size original, enter the original
size manually.
), an incorrect size will be detected.
For an 5-1/2" x 8-1/2"R (A5R) size original, enter the original
size manually.Specify the destination.
RETRIEVING A DESTINATION FROM AN ADDRESS BOOK Scan to E-mail
 Scan to FTP
 Scan to Network Folder
 , the destination of the tapped key is automatically
specified.
, the destination of the tapped key is automatically
specified.Tap the [Original] key.
Tap the appropriate orientation key.
Specify the orientation of the original placed in step 1. .
.
Tap the [B/W Start] or [Colour Start] key to start scanning of the original.
If the original was placed on the document glass, replace it with the next original and tap the [B/W Start] or [Colour Start] key.
Repeat until all originals have been scanned.Tap the [Read-End] key.
A beep will sound to indicate that the operation is completed.Change the subject, file name, reply-to,
and body text when performing a scan transmission. If necessary,
directly enter the text.
Tap the [Detail] key to change to normal mode.
EASY MODETo change the subject, tap the [Subject] entry box.

Tap a pre-set text key.
After the settings are completed, tap.
To change the file name, tap the [File Name] entry box.
After the settings are completed, tap.
Tap [Options].
To change the reply address, tap the [Reply-To] entry box.
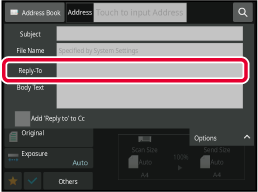
Tap the key that you wish to use for the reply address.
After the settings are completed, tap. adds a reply address to the Cc address.
To change the body text, tap the [Body Text] entry box.
Enter the body text.
After the settings are completed, tap.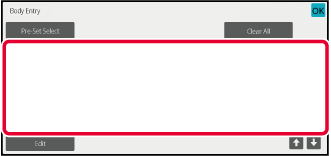
Send the same scanned image to multiple
scan destinations in a single operation.
One operation allows you to send data to up to 500 destinations,
including the reserved send jobs. (For example, if broadcast transmission
jobs with 450 destinations are already reserved, data can be broadcasted
to up to 50 destinations.)
.png)
It is convenient to store destinations you frequently
use for broadcast transmission as contacts or groups.
A maximum of 500 destinations can be stored in one contact.
USING A TRANSMISSION LOG TO RESEND
(factory default setting),the image is
only sent to those destinations among the destinations that are
set to [Set as Default used] which are for the currently selected mode. If
the checkmark is removed
 , the image can also be sent to destinations
of other modes.
, the image can also be sent to destinations
of other modes.Place the original.
Place the original in the document feeder tray of the automatic document feeder, or on the document glass.Specify all destinations.
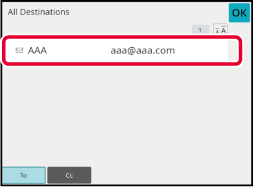
RETRIEVING A DESTINATION FROM AN ADDRESS BOOK before specifying the next destination.Tap [Address Review] on the action panel.
Confirm the destination.
Tap the [B/W Start] or [Colour Start] key ([Start] key in normal mode) to start scanning of the original.
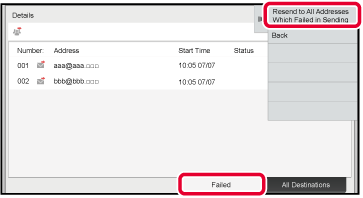
The results of a completed broadcast transmission
can be checked in the job management screen. If transmission to any
of the destinations failed, resend the image to those destinations.
Tap the job management display.
Tap the [Scan] tab and tap the [Complete] key.

After tapping the key of the completed broadcast transmission, tap [Print Image Sending Activity Report] on the action panel.

After tapping the [Failed] tab, tap [Resend to All Addresses Which Failed in Sending] on the action panel to resend the image.
Version 04a / bp90c80_usr_04a_en
