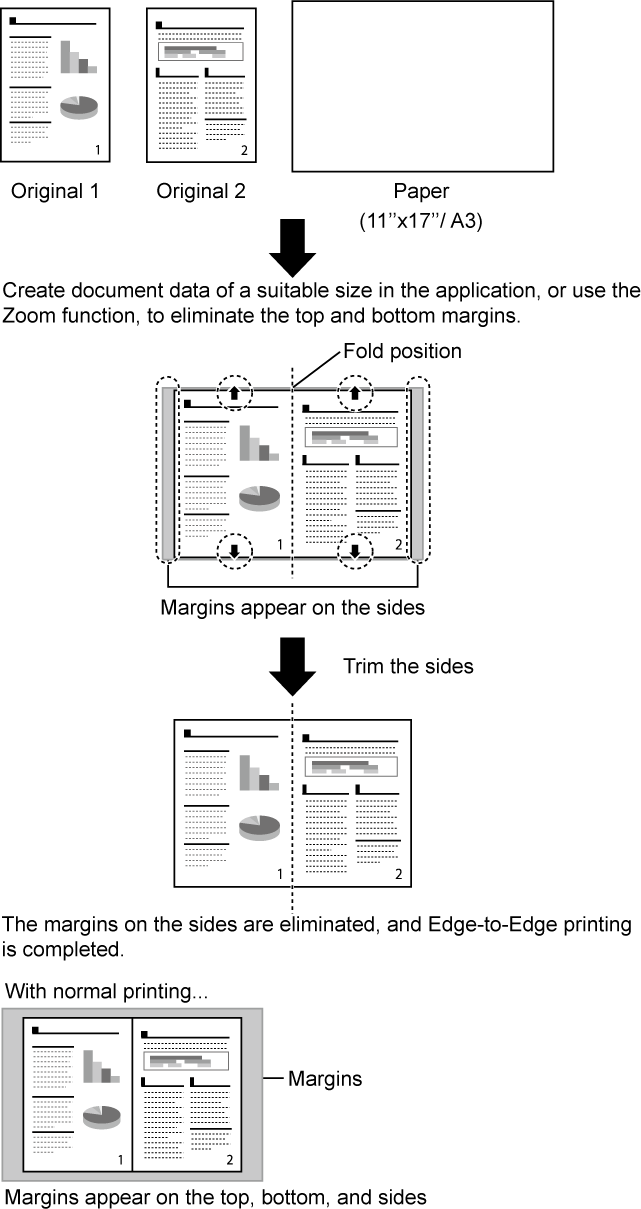
PRINTING WITHOUT TOP AND BOTTOM MARGINS
(EDGE-TO-EDGE PRINTING)
This function enables printing without top and bottom
margins.
By combining this function with the saddle stitch printing
and trimming functions, a booklet or pamphlet without margins can
be created. (Excluding printing on long paper)
This function can only be used for 11" x 17"/A3, 8-1/2" x
11"/A4, and long paper.
Edge-to-Edge Printing with long paper is available.
When using Edge-to-Edge Printing with long paper, paper
sizes up to 26.3" (668 mm) can be used, and the paper type can be
selected from heavy paper 1, heavy paper 2, and user type 1 to 11.
Combination
of Edge-to-Edge Printing
- Edge-to-Edge
Printing and Long paper: Single sheet
- Edge-to-Edge
Printing and 11" x 17"/A3: Single sheet
- Edge-to-Edge
Printing and 8-1/2" x 11"/A4: Single sheet
- Edge-to-Edge
Printing, 11" x 17"/A3, Saddle Stitch and Trimming: 8-1/2" x 11"/A4
size pamphlet
- Edge-to-Edge
Printing, 8-1/2" x 11"/A4, Saddle Stitch and Trimming: 5-1/2" x
8-1/2"/A5 size pamphlet
To use this function effectively, create document
data in the application that is 2 mm longer than the top and bottom
of the paper, and 2 mm shorter in the direction of feeding.
SADDLE STITCH PRINTING
AND 2-POSITION STAPLING
Windows
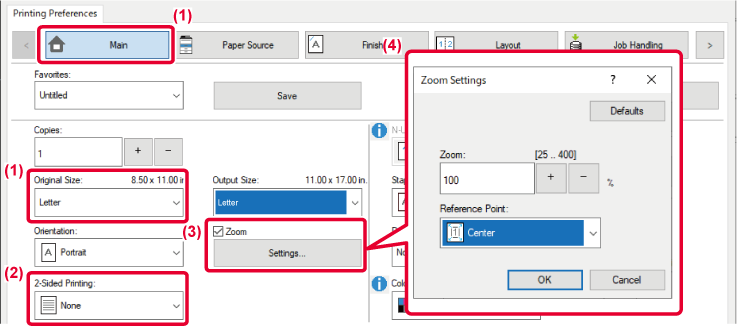
- Click the [Main] tab and select the original size
in [Original Size].
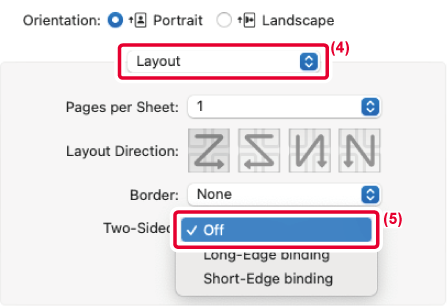
- Select [None] in [2-Sided Printing].
- Check the [Zoom] checkbox and click [Settings].
- Specify the zoom value, select [Center] in [Reference Point]
and click [OK].
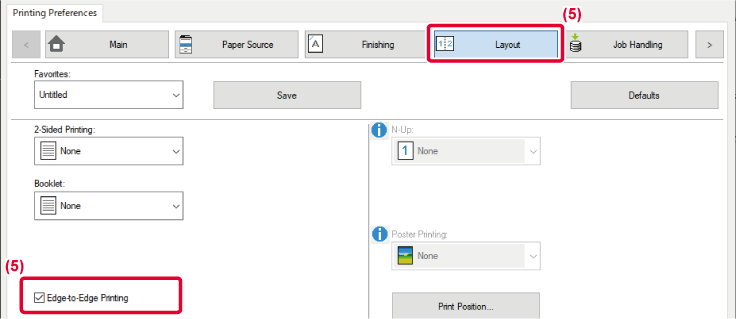
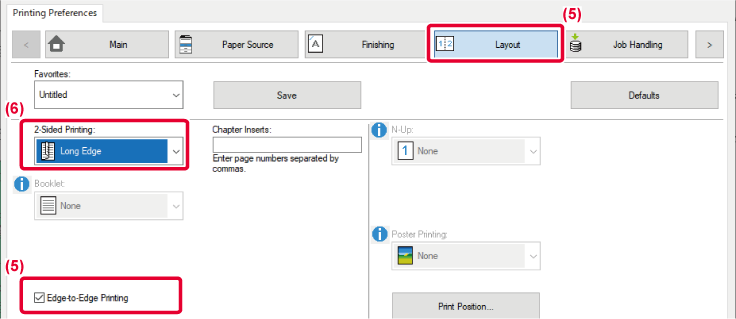
- Click the [Layout] tab and check the [Edge-to-Edge Printing]
checkbox.
- Select [Standard] in [Booklet].
- Select the output size in [Output Size].
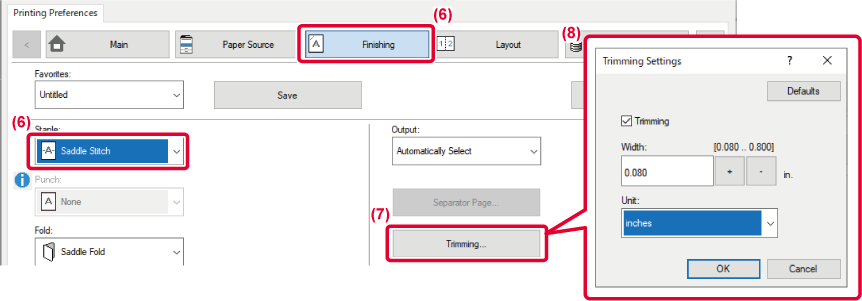
- Click the [Finishing] tab and select [Saddle Stitich] in
[Staple].
- Click [Trimming].
- Check the [Trimming] checkbox, specify "0.200 inches (5.0
mm)" and click [OK].
macOS
- Select the paper size.
Depending on the printing data, select "A5 (Booklet
Edge-to-Edge Printing)".
- Select [Page Setup] from the [File] menu and enter the ratio
(%).
- Click the [OK] button.
- Select [Layout].
- Select [Off] .
In macOS 13, Binding is selected in "Double-sided".
- Select [Printer Features] and then select [Output].
In macOS 13, [Printer Features] is located under the
"Printer Options" menu.
- Select [Saddle Stitch].
- Select [Tiled].
- Select [Edge-to-Edge Printing].
- Select [Trimming].
In macOS 13, [Trimming] is located under the "Printer
Options" menu.
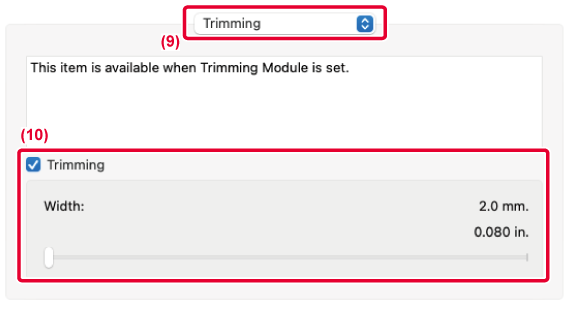
- Set the [Trimming] checkbox to
 and specify "0.200 inches (5.0 mm)".
FOLD STAPLING
Windows
- Click the [Main] tab and select the original size
in [Original Size].
- Select [None] in [2-Sided Printing].
- Check the [Zoom] checkbox and click [Settings].
- Specify the zoom value, select [Center] in [Reference Point]
and click [OK].
- Click the [Layout] tab and check the [Edge-to-Edge Printing]
checkbox.
- Click the [Finishing] tab and select [Saddle Stitich] in
[Staple].
- Click [Trimming].
- Check the [Trimming] checkbox, specify "0.200 inches (5.0
mm)" and click [OK].
macOS
- Select the paper size.
Depending on the printing data, select "A5 (Booklet
Edge-to-Edge Printing)".
- Select [Page Setup] from the [File] menu and enter the ratio
(%).
- Click the [OK] button.
- Select [Layout].
- Select [Off] .
In macOS 13, Binding is selected in "Double-sided".
- Select [Printer Features] and then select [Output].
In macOS 13, [Printer Features] is located under the
"Printer Options" menu.
- Select [Saddle Stitch].
- Select [Edge-to-Edge Printing].
- Select [Trimming].
In macOS 13, [Trimming] is located under the "Printer
Options" menu.
- Set the [Trimming] checkbox to
and specify "0.200 inches (5.0 mm)".
SINGLE SHEET
Long paper
Windows
- Click the [Main] tab and select the original size
in [Original Size].
- Select the paper orientation.
When long paper is set, select "Landscape".
- check the [Zoom] checkbox and click [Settings].
- Specify the zoom value and select [Center] in [Reference
Point] and click [OK].
- Click the [Layout] tab and check the [Edge-to-Edge Printing]
checkbox.
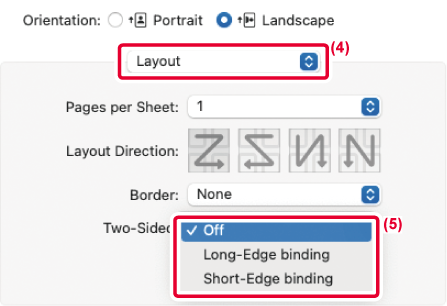
- Select [None], [Long Edge] or [Short Edge] in 2-Sided Printing.
2-sided printing cannot be used when long paper is
set.
Check the actual print result. If margins appear,
change the following settings.
"Trimming" in the Trimming Settings dialog
"Print Position" in the Compatibility dialog
macOS
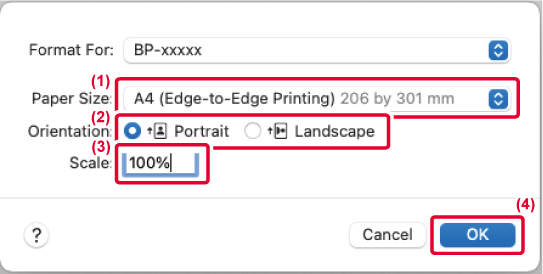
- Select the paper size.
Select "A4 (Edge-to-Edge Printing)" or "A5 (Edge-to-Edge
Printing)" when setting a single sheet, and select "A4_3-panel_E2E" or
"A4_3-panel_E2E_for_trim" when setting a long paper.
- Select the paper orientation.
When long paper is set, select "Landscape".
- Select [Page Setup] from the [File] menu and enter the ratio
(%).
- Click the [OK] button.
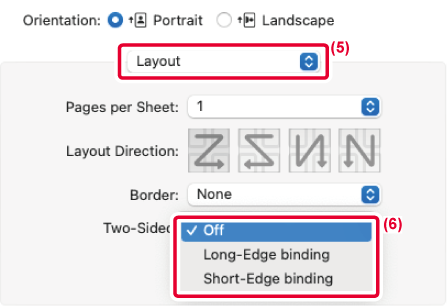
- Select [Layout].
- Select [Off], [Long Edge] or [Short Edge]
In macOS 13, Binding is selected in "Double-sided".
2-sided printing cannot be used when long paper is
set.
- Select [Printer Features] and then select [Output].
In macOS 13, [Printer Features] is located under the
"Printer Options" menu.
- Select [Edge-to-Edge Printing].
Check the actual print result. If margins appear,
change the following settings.
"Trimming" in the Trimming Settings dialog
"Print Position" in the Compatibility dialog