Paper tray and paper type settings are explained in
this section.
These settings specify the paper type, paper size, and functions
allowed for each paper tray.
When the [Tray Settings] key is tapped, a list appears showing
the trays and the current settings.
When a tray runs out of paper during printing, this
determines whether or not another tray with the same size and type
of paper is automatically selected and printing continues.
You can have the paper tray settings appear automatically
when paper is detected in the bypass tray.
These are used to control the toner fusing temperature
according to the weight of the paper.
These settings apply to recycled paper, punched paper, pre-printed
paper, letterhead paper, colored paper, and user type paper.
Enter "/".
You can select "60g/m2 to 89g/m
2" or "90g/m2 to
105g/m2" ("16 to 24 lbs." or "24+ to
28 lbs.").
When the [Change] key is tapped, the corresponding setting
screen appears.
The following settings can be configured.
| List name | Description |
|---|---|
|
Type |
Select a type of paper to be loaded into the tray. The paper types that can be selected vary by paper tray. For more information see " Tray Settings". To user type setup, see " Paper Type Registration". |
|
Size |
Select the paper size from the list. The paper sizes that can be selected vary by tray. The sizes that can be selected may also be restricted by the paper type selected above. For more information see " Tray Settings". If the desired size does not appear in the list, select [Custom Size] and directly enter the size (only for the bypass tray). For more information see " Tray Settings". |
|
Feeding Approved Job |
Select the modes that can be used. If there is a function that you do not wish to be used with the selected tray, disable the function. |
| Paper Tray | Paper Type | Size |
|---|---|---|
|
Tray 1 |
Plain Paper 1 to 2*1, Recycled, Color, Letter Head, Pre-Printed, Pre-Punched, User Type |
8-1/2" x 11", A4 |
|
Tray 2 |
Plain Paper 1 to 2*1, Recycled, Color, Letter Head, Pre-Printed, Pre-Punched, User Type |
8-1/2" x 11", A4 |
|
Tray 3 |
Plain Paper 1 to 2*1, Recycled, Color, Letter Head, Pre-Printed, Pre-Punched, Heavy Paper 1 to 4*2, User Type |
Auto-Inch (12" x 18", 11" x 17", 8-1/2" x 14", 8-1/2" x 11", 8-1/2" x 11"R, 7-1/4" x 10-1/2"R), Auto-AB (A3W, A3, B4, A4, A4R, B5, B5R, 8-1/2" x 13" (216 x 330 mm)*3), 9" x 12" (A4W), 8-1/2" x 13-1/2" (216 x 343 mm) *3, 8-1/2" x 13-2/5" (216 x 340 mm)*3), 8K, 16K, 16KR |
|
Tray 4 |
Plain Paper 1 to 2*1, Recycled, Color, Letter Head, Pre-Printed, Pre-Punched, Heavy Paper 1 to 4*2, Embossed, Envelope, Tab Paper, Transparencies, Labels, User Type |
Auto-Inch (12" x 18", 11" x 17", 8-1/2" x 14", 8-1/2" x 11", 8-1/2" x 11"R, 7-1/4" x 10-1/2"R, 5-1/2" x 8-1/2"R), Auto-AB (A3W, A3, B4, A4, A4R, B5, B5R, A5R, 8-1/2" x 13" (216 x 330 mm)*3), 9" x 12" (A4W), 8-1/2" x 13-1/2" (216 x 343 mm) *3, 8-1/2" x 13-2/5" (216 x 340 mm)*3), 8K, 16K, 16KR, custom size Monarch, COM9, COM10 |
|
Tray 5 |
Plain Paper 1 to 2*1, Recycled, Color, Letter Head, Pre-Printed, Pre-Punched, Heavy Paper 1 to 2*2, User Type |
8-1/2" x 11", A4, B5 |
|
Tray 5 |
Plain Paper 1 to 2*1, Recycled, Color, Letter Head, Pre-Printed, Pre-Punched, Heavy Paper 1 to 2*2, User Type |
11"×17", 8-1/2" x 14", 8-1/2" x 13" (216 x 330 mm), 8-1/2" x 11", 8-1/2" x 11"R, SRA3, SRA4, A3, B4, A4, A4R, B5, 12" x 18" (A3W) |
|
Tray 5/7 |
Plain Paper 1 to 2*1, Recycled, Color, Letter Head, Pre-Printed, Pre-Punched, Thin Paper, Heavy Paper 1 to 4*2, Heavy Paper (110 lbs cover to 130 lbs cover (301 g/m2 to 360 g/m2)), Embossed, Tab Paper, Transparencies, Labels, Glossy Paper, User Type |
Auto-Inch (13" x 19", 12" x 18", 9" x 12", 11" x 17", 8-1/2" x 14"*3, 8-1/2" x 13-1/2" (216 x 343 mm)*3, 8-1/2" x 13-2/5" (216 x 340 mm)*3, 8-1/2" x 11", 8-1/2" x 11"R, 7-1/4" x 10-1/2"R, SRA3, A3W, A3, B4, SRA4, A4W, A4, B5), Auto-AB (SRA3, A3W, A3, B4, SRA4, A4W, A4, A4R, B5, B5R, 13" x 19", 12" x 18", 11" x 17", 8-1/2" x 13-1/2" (216 x 343 mm) *3, 8-1/2" x 13-2/5" (216 x 340 mm)*3, 8-1/2" x 13" (216 x 330 mm)*3, 8-1/2" x 11"), 8K, 16K, 16KR, custom size |
|
Tray 6/8 |
Plain Paper 1 to 2*1, Recycled, Color, Letter Head, Pre-Printed, Pre-Punched, Thin Paper, Heavy Paper 1 to 4*2, Heavy Paper (110 lbs cover to 130 lbs cover (301 g/m2 to 360 g/m2)), Embossed, Tab Paper, Transparencies, Labels, Glossy Paper, User Type |
Auto-Inch (13" x 19", 12" x 18", 9" x 12", 11" x 17", 8-1/2" x 14"*3, 8-1/2" x 13-1/2" (216 x 343 mm)*3, 8-1/2" x 13-2/5" (216 x 340 mm)*3, 8-1/2" x 11", 8-1/2" x 11"R, 7-1/4" x 10-1/2"R, SRA3, A3W, A3, B4, SRA4, A4W, A4, B5), Auto-AB (SRA3, A3W, A3, B4, SRA4, A4W, A4, A4R, B5, B5R, 13" x 19", 12" x 18", 11" x 17", 8-1/2" x 13-1/2" (216 x 343 mm) *3, 8-1/2" x 13-2/5" (216 x 340 mm)*3, 8-1/2" x 13" (216 x 330 mm)*3, 8-1/2" x 11"), 8K, 16K, 16KR, custom size |
|
Bypass tray |
Plain Paper 1 to 2*1, Recycled, Color, Letter Head, Pre-Printed, Pre-Punched, Thin Paper, Heavy Paper 1 to 4*2, Heavy Paper (110 lbs cover to 130 lbs cover (301 g/m2 to 360 g/m2)), Embossed, Envelope, Tab Paper, Transparencies, Labels, Glossy Paper, User Type |
Auto-Inch (13" x 19", 12" x 18", 11" x 17", 8-1/2" x 14"*3, 8-1/2" x 13-1/2" (216 x 343 mm)*3, 8-1/2" x 13-2/5" (216 x 340 mm)*3, 8-1/2" x 11", 8-1/2" x 11"R, 7-1/4" x 10-1/2"R, 5-1/2" x 8-1/2"R *3, SRA3, A3, B4, SRA4, A4, B5), Auto-AB (SRA3, A3W, A3, B4, SRA4, A4, A4R *3, B5, B5R, A5R, A6R, 13" x 19", 11" x 17", 8-1/2" x 13-1/2" (216 x 343 mm) *3, 8-1/2" x 13-2/5" (216 x 340 mm)*3, 8-1/2" x 13" (216 x 330 mm), 8-1/2" x 11"), Monarch, COM9, COM10, DL, C4, C5, C6, 9" x 12" (A4W), 8K, 16K, 16KR, custom size |
|
Bypass tray |
Plain Paper 1 to 2*1, Recycled, Color, Letter Head, Pre-Printed, Pre-Punched, Thin Paper, Heavy Paper 1 to 2*2, Tab Paper, Transparencies, User Type |
Auto-Inch (12" x 18", 11" x 17", 9" x 12", 8-1/2" x 14", 8-1/2" x 13-1/2" (216 x 343 mm)*3, 8-1/2" x 13-2/5" (216 x 340 mm)*3, 8-1/2" x 11", 8-1/2" x 11"R*3, 7-1/4" x 10-1/2"R, 5-1/2" x 8-1/2"R, A3, B4, A4), Auto-AB (A3W, A3, B4, A4W, A4, A4R*3, B5, B5R, A5R, 11" x 17", 8-1/2" x 13-1/2" (216 x 343 mm)*3, 8-1/2" x 13-2/5" (216 x 340 mm)*3, 8-1/2" x 13" (216 x 330 mm)*3, 8-1/2" x 11"), 13" x 19", SRA3, SRA4, 8K, 16K, 16KR, custom size |
|
Inserter |
Plain Paper 1 to 2*1, Recycled, Color, Letter Head, Pre-Printed, Pre-Punched, Heavy Paper 1 to 2*2, User Type |
Auto-Inch (12" x 18", 9" x 12", 11" x 17", 8-1/2" x 14"*3, 8-1/2" x 13-1/2" (216 x 343 mm)*3, 8-1/2" x 13-2/5" (216 x 340 mm)*3, 8-1/2" x 11", 8-1/2" x 11"R*3, 7-1/4" x 10-1/2"R, 5-1/2" x 8-1/2"R, A3, B4, A4W, A4), Auto-AB (A3W, A3, B4, A4W, A4, A4R*3, B5, B5R, A5R, 11" x 17", 8-1/2" x 13-1/2" (216 x 343 mm)*3, 8-1/2" x 13-2/5" (216 x 340 mm)*3, 8-1/2" x 13" (216 x 330 mm)*3, 8-1/2" x 11"), 13" x 19", SRA3, SRA4, 8K, 16K, 16KR, custom size |
*1 Plain Paper 1: 16 lbs bond to 24 lbs bond (60 g/m2 to 89 g/m2) Plain Paper 2: 24 lbs bond to 28 lbs bond (90 g/m 2 to 105 g/m 2)
*2 Heavy paper 1: 28 lbs bond to 65 lbs Cover (106 g/m2 to 176 g/m 2) Heavy paper 2: 65 lbs Cover to 80 lbs Cover (177 g/m 2 to 220 g/m 2) Heavy paper 3: 80 lbs Cover to 140 lbs Index (221 g/m 2 to 256 g/m 2) Heavy paper 4: 140 lbs Index to 110 lbs Cover (257 g/m 2 to 300 g/m 2) Thin paper: 13 lbs bond to 16 lbs. bond (55 g/m2 to 59 g/m2)
*3 The size that is automatically detected is set in "Select Paper Sizes for Auto Detection" in the bypass tray settings screen.
"Select Paper Sizes for Auto Detection" in the bypass
tray settings screen is used to select the paper size that is automatically
detected from similar sizes when the automatic paper size detection
takes place.
When paper that is the same size as one of the paper sizes
in the settings is placed in the bypass tray, the size that is selected
in the settings will be automatically detected.
| List name | Description |
|---|---|
|
Auto-AB |
A4R, A5, 216mm x 330mm (8-1/2” x 13"), 216mm x 340mm (8-1/2" x 13-2/5"), 216mm x 343mm (8-1/2" x 13-1/2") |
|
Auto-Inch |
8-1/2" x 14", 8-1/2" x 13-2/5" (216 mm x 340 mm), 8-1/2" x 13-1/2" (216 mm x 343 mm) |
If you frequently use a non-standard size paper in the
bypass tray, register that paper size in advance.
Registering the paper size saves you the trouble of setting
the size each time you need to use it.
Up to Seven paper sizes can be registered.
Tap the key ([Custom 1] to [Custom 7]) in which you wish to
register or change a paper size, and the registration screen appears.
Select whether you wish to enter the size in mm ("Size Input-AB")
or inches ("Size Input-Inch"), and then set the X and Y dimensions
of the paper.
"Size Input-AB"
The X direction can be set between 140mm and 457mm.
The Y direction can be set between 90mm and 320mm.
When [Add] is tapped in Paper Settings selection in
the paper tray settings, the Paper Settings registration screen appears.
By selecting advanced settings in Paper Properties for the paper
to be used, you can print using the most suitable conditions for
the printed mater.
A maximum of 1000 properties can be registered.

| Item | Description | |
|---|---|---|
|
Name |
Enter a name for the Paper Settings (maximum of 50 half or full width characters). |
|
|
Search Number |
Set a search number. |
|
|
[Default Settings] tab |
||
|
Paper Weight Setting |
Set the paper weight to be used. |
|
|
Unit |
Set the units used for the Paper Weight. |
|
|
Paper Type |
Set the paper type. Select the paper type based on the surface finish of the paper or select the envelope. The following types can be selected. |
|
|
Paper Information |
Set when Color paper, Tab Paper, or Pre-Punched paper is used. |
|
|
Paper Property |
Set the properties of the paper to be used. For the properties, refer to the settings in "Paper Type Registration". |
|
|
[Detail] tab |
||
|
Fusing Temperature Settings |
Set the appropriate fusing unit temperature for the paper to be used. |
|
|
Fuser Pressure Setting |
Adjust the pressure on the paper. Some types of paper such as thick paper may not bend easily, and this may cause transfer deviations. You can use this setting to adjust the pressure on the paper and reduce transfer deviations. |
|
|
Double Feed Detection Setting |
Specify whether double feeds are detected. This function cannot be used when paper heavier than 68 lbs. (256 g/m 2) is used. |
|
|
Primary Transfer Setting |
Set the current of the primary transfer unit that is used to transfer toner to the transfer belt. By adjusting the current of the primary transfer unit, transfer problems such as insufficient transfer to the transfer belt can be improved. Select settings for both black & white and 4 color (black, cyan, magenta, yellow). |
|
|
Secondary Transfer Setting |
Set the current of the secondary transfer unit that is used to transfer toner from the transfer belt to the paper. By adjusting the current of the secondary transfer unit, transfer problems such as insufficient transfer to the paper can be improved. When Uncoated Paper is selected for [Paper Type] Set for the Side 1 and Side 2 for both black & white and color. When other than Uncoated Paper is selected for [Paper Type] Select settings for both black & white and color. |
|
|
PTC Current Value Setting |
Set the PTC discharge current. The PTC discharge current can be adjusted to obtain transferability suitable for the paper being used. When Embossed is selected for the [Paper Type] Set for both black & white and color. When other than Embossed is selected for [Paper Type] Set for black & white and color at the same time. |
|
|
Transfer Condition Adjustment Setting |
Set enable/disable of transfer environment correction of Primary Transfer Current Value, Secondary Transfer Current Value and PTC Current Value. |
|
|
Motor Speed Setting |
You can adjust the motor speed and the speed change timing. |
|
|
Color Reg. Adjustment |
This performs color registration adjustment. |
|
|
Paper Reg. Adjustment |
You need to bend the paper to print at the correct position on the paper. This function adjusts the proper amount of deflection. |
|
|
Maximum Density Setting |
This performs the adjustment of maximum density for each of Y/M/C/K. |
|
|
Side 1/2, XY Ratio/Print Position Auto Adjust |
By reading a chart (output paper) for adjustment, the XY ratio and XY print position on the Side 1/2 of the paper are automatically adjusted. |
|
|
Side 1/2, XY Ratio Settings |
Configure settings to equalize the size of the image in duplex printing. This adjusts the size of the image on the Side 1 and Side 2 sides of the paper. |
|
|
Side 1/2, XY Print Position |
Configure settings to make the Side 1 and Side 2 centers match in duplex printing. This corrects Side 1 and Side 2 misalignment. |
|
|
Print Void Settings |
Adjust void areas at the top, bottom, and front/rear direction (leading and trailing ends) of the paper. |
|
By reading a chart (output paper) for adjustment, the
XY ratio and XY print position on the Side 1/2 of the paper are automatically
adjusted.
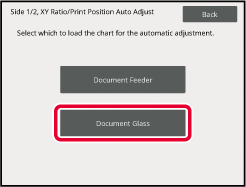
Tap [Document Feeder].

Print and read the chart.


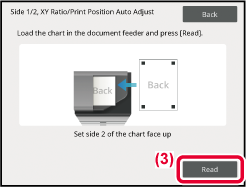
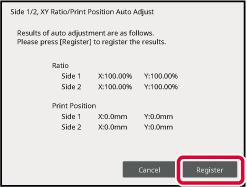
When the adjustment result is displayed, tap [Register].
Tap [Document Glass].
Tap [Print Auto-adjustment Cover Sheet], print the cover sheet, then select the number of charts, and tap [Print Chart].

Print and read the chart.


When the adjustment result is displayed, tap [Register].
The Side 1/2, XY Ratio Settings are used to eliminate
print deviation by changing the Side 1/Side 2 ratio so that the
print sizes match.
Tap [Change] in the Side 1/2, XY Ratio Settings to display
the advanced settings screen of the Side 1/2, XY Ratio Settings.

| Measurement Line (Measurement Marker) | Length specified by measurement line interval |
|---|---|
|
Assistant Line |
50 mm (1.969 inch) |
 |
100 mm |
 |
5 inch |
The Side 1/2, XY Print Position Settings are used to
make the centers of the Side 1 and Side 2 print positions match
to remove printing misalignment.
Tap the [Change] button in Side 1/2, XY Print Position Settings
to display the advanced settings screen of Side 1/2, XY Print Position
Settings.
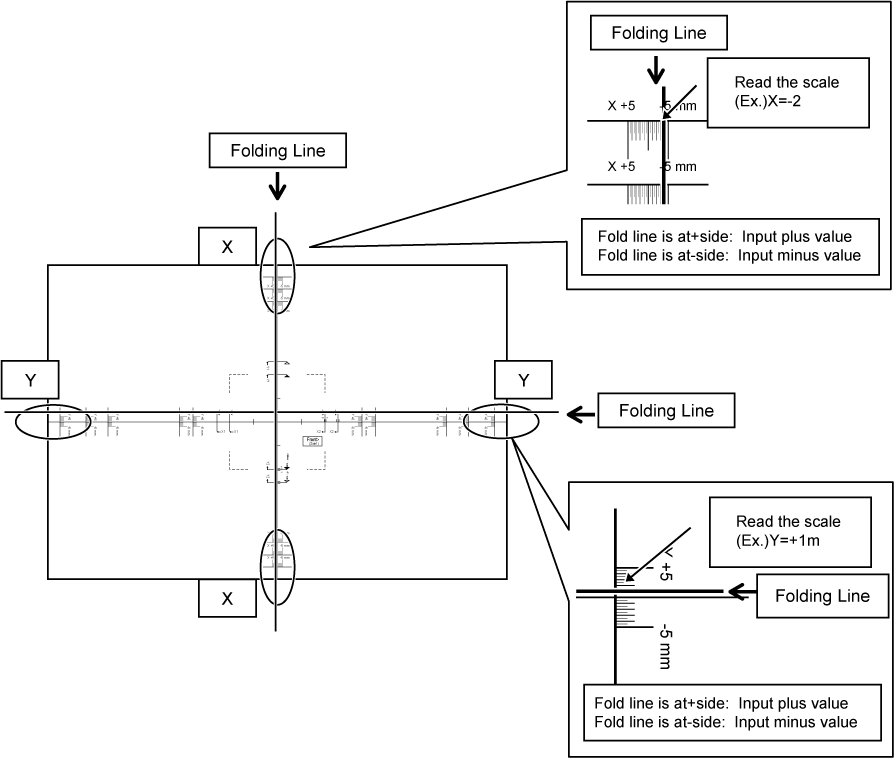
To specify Side 1/2, XY Print Position Settings and
Side 1/2, XY Ratio Settings, print a pattern for measurement.
Content of the
measurement pattern
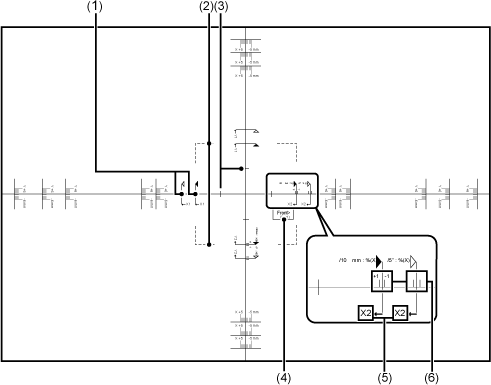
| No. | Item | Description |
|---|---|---|
|
1 |
Measurement Line |
Reference line for measurement. Measurement lines for AB sizes and inch sizes have been created. |
|
2 |
Dot Line |
This line is visible through the Side 1 and Side 2 to let you visually check for misalignment. The line is printed at the same position on the Side 1 and Side 2. If visual inspection reveals that the lines are not aligned, the print positions on the Side 1 and Side 2 are not aligned. |
|
3 |
Assistant Line |
Assistant line located 25 mm from the center of the paper. When the paper size is 100 mm or less, use this line for measurement. |
|
4 |
Notes (Side 1/Side 2) |
These indicate the Side 1 and Side 2. |
|
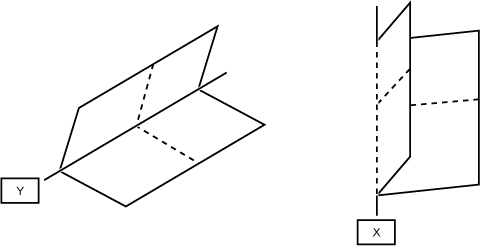
5 |
Notes (X/Y axis) |
When entering the settings, these indicate the X and Y axes of the paper. |
|
6 |
Assistant Line (Magnification) |
Indicates a position that is ±1% of the measured distance. |


Store a paper type when the desired paper type does
not appear as a selection or when you wish to create a new set of paper
properties.
Up to 11 paper types can be registered.
| List name | Description |
|---|---|
|
Type Name |
Register any name. The factory default names are "User Type 1" to "User Type 11". |
|
Fixed Paper Side |
Use this setting when paper with a front and reverse side is used.
|
|
Disable Duplex |
Use this setting when paper loaded cannot be used for 2-sided printing.
|
|
Disable Staple |
Use this setting when paper used cannot be stapled.
|
|
Disable Punch |
Use this setting when paper used cannot be punched.
|
|
Disable Fold |
Use this setting when using paper that cannot be disable fold.
|
Version 04a / bp90c80_usr_04a_us
