BASIC PRINTING PROCEDURE
The following example explains how to print a document
from the standard accessory application "TextEdit" in macOS.
- To
install the printer driver and configure settings in a macOS environment,
see the Software Setup Guide.
- The explanations
of screens and procedures for use in a macOS environment generally
assume that macOS 11 is being used and a PPD driver is installed.
The screens may be different depending on the version of the operating
system or the software application.
- The menu
used to execute printing may vary depending on the application.
Select [Page Setup] from the [File] menu and select
the printer.
If the printer drivers appear as a list, select the name
of the printer driver to be used from the list.
Select paper settings.
- Make sure that the correct printer is selected.
- Select paper settings.
Paper size, paper orientation, and enlarge/reduce settings
can be selected.
- Click the [OK] button.
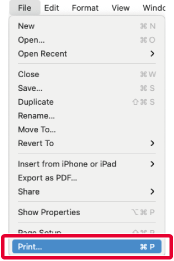
Select [Print] from the [File] menu.
Select print settings.
- Make sure that the correct printer is selected.
- Select an item from the menu and configure the settings
as needed.
When the menu do not appear, click on the "Show Details"
button.
- Click the [Print] button.
The layout of the settings menu is different in
macOS 13 and macOS 14.
SELECTING THE PAPER
This section explains the
[Paper Feed] settings in the print settings window.
- When [Auto Select]
is selected:
A tray that is set for plain or recycled paper
(only plain paper 1 in the factory default setting) of the size
specified in "Paper Size" on the page setup screen is automatically
selected.
- When a paper
tray is specified:
The specified tray is used for printing regardless
of the "Paper Size" setting on the page setup screen.
For the bypass tray, also specify the paper type. Check that the
paper type that is set for the bypass tray of the machine, check
that paper of that type is actually loaded into the bypass tray,
and then select the appropriate bypass tray (paper type).
- When a paper
type is specified:
A tray with the specified type of paper and
the size specified in "Paper Size" on the page setup screen is used
for printing.
When [Enable Detected Paper Size in Bypass Tray] (disabled by factory default)
or [Enable Selected Paper Type in Bypass Tray] (enabled by factory default), which
you can reach
by selecting [System Settings] in "Settings (administrator)" → [Printer Settings]
→ [Condition Settings] → [Bypass Tray Settings] is enabled, printing will not take
place if the paper size or paper type specified in the printer driver
is different from the paper size or paper type specified in the
settings of the bypass tray.
PRINTING ON ENVELOPES
The bypass tray or tray 1 can be used for
envelope printing.
Caution
When loading envelopes, the fusing pressure release
lever must be operated. Be sure to operate the fusing pressure release lever
by refer to "
Fusing pressure release lever".
- For
the types of paper that can be used in the tray, see "
APPLICABLE
PAPER TYPES".
- For the
procedure for loading paper in the bypass tray, see "
LOADING PAPER INTO THE BYPASS
TRAY".
- For the
procedure for loading envelope in the tray 1, see "
TRAY 1 - 4".
- For more
information on the procedure for loading paper, see "
SELECTING THE PAPER".
- When using
media such as envelopes that can be loaded only in a specific orientation,
you can rotate the image 180 degrees. For more information, see
"ROTATING THE PRINT IMAGE 180 DEGREES (ROTATE 180 DEGREES)".
- After
printing, there may be creases in the envelope depending on the
envelope type and format as well as on the printing environment.
Before high-quantity printing, it is recommended that you conduct
a test print.
Select the envelope size in the settings of the application
("Page Setup" in many applications) and then perform the following
steps.
Select print settings.
- Select the envelope size from the "Paper Size"
menu.
- Select [Paper Feed].
In macOS 13 and macOS 14, [Paper Feed] is located under
the "Printer Options" menu.
- Select the [Bypass Tray (Envelope)] or [Tray 1] from the "All Pages From"
menu.
When [Enable Selected Paper Type in Bypass Tray] (enabled by factory default)
is enabled in "Settings (administrator)", set the paper type of
the bypass tray to [Envelope].
.png)