PRINTING SPECIFIC PAGES ON DIFFERENT PAPER (DIFFERENT PAPER)
In a Windows environment
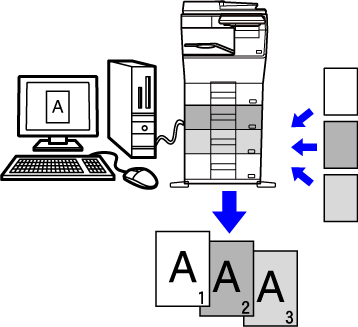
The front and back covers and specified pages of a document
are printed on paper that is different from the other pages.
Use this function when you wish to print the front and back
covers on heavy paper, or insert colored paper or a different paper
type at specified pages.
As necessary, paper can be inserted as insertion sheets where
nothing is printed.
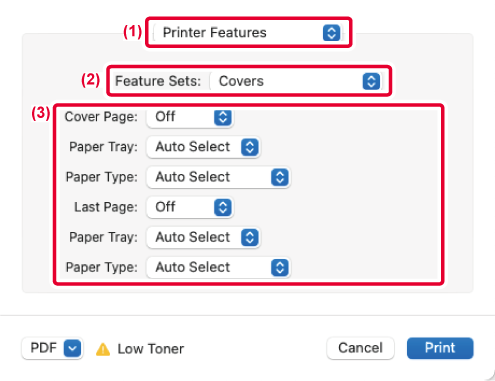
In a macOS environment
The front and back covers are printed using paper that
is different from the other pages. This function can be used, for example,
when you want to print only the front cover and last page on thick
paper.
Windows
- Click the [Inserts] tab.
- Select [Covers/Inserts] from [Inserts Option], and click the [Settings]
button.
- Select the paper insertion settings.
- Select
the insertion position, paper source, and printing method from the
corresponding menus.
- Click the [Add]
button and your settings will appear in "Information".
- When you have finished
selecting settings, click the [Save] button in "Favorites"
to save the settings.
- When
[Bypass Tray] is selected in "Paper Tray", be sure to select the
"Paper Type" and load that type of paper in the bypass tray.
- When [Other Page]
is selected for "Insert Position", specify the insert position by directly
entering a page number. When "Printing Method" is set to [2-Sided Printing],
the specified page and the next page after it will be printed on
the front and reverse side of the paper, and thus an insert setting
at a page printed on the reverse side will not be effective.
macOS
- Select [Printer Features].
In macOS 13 and macOS 14, [Printer Features] is located
under the "Printer Options" menu.
- Select [Covers].
- Select the cover insertion settings.
Select the print setting, paper tray, and paper type
for the front and back covers.
ADDING INSERTS WHEN PRINTING ON TRANSPARENCY FILM (TRANSPARENCY
INSERTS)
When transparency film is used for printing,
this function prevents the sheets of transparency film from sticking
together by inserting a sheet of paper between each sheet of film.
As necessary, the same content as that printed on each sheet of
transparency film is also printed on the corresponding sheet of
inserted paper.
Windows
- Click the [Inserts] tab.
- Select [Transparency Inserts] and click the [Settings] button.
Select the print setting, paper tray, and paper type
for the front and back covers.
- Select the transparency insert settings.
When the [Printed] checkbox is selected to set to
 , the same content as that printed on
the transparency film is also printed on the insert. Select the
paper source and type if needed.
, the same content as that printed on
the transparency film is also printed on the insert. Select the
paper source and type if needed.
Set the paper type of the bypass tray to [Transparency]
and load transparency film into the bypass tray.
macOS
- Select [Printer Features].
In macOS 13 and macOS 14, [Printer Features] is located
under the "Printer Options" menu.
- Select [Transparency Inserts] in "Feature Sets".
- Select the transparency insert settings.
When [On (Printed)] is selected from "Transparency Inserts", the
same content as that printed on the transparency film is also printed
on the insert. Select the paper source and type if needed.
Set the paper type of the bypass tray to [Transparency]
and load transparency film into the bypass tray.
INSERTING SEPARATOR PAGES BETWEEN JOBS OR COPIES
You can insert separator pages between jobs
or the specified number of copies.
This function is available in a Windows environment.
Windows
- Click the [Finishing] tab.
- Click the [Separator Page] button.
- Changing the settings
- Select
the paper tray and paper type from "Paper Selection", and specify the
separator page position in "Insert Position".
- To add a separator
page each time printing of the set number of copies is completed,
select [Per Copies] in "Insert Position".
- For example, if you
are printing 10 copies and you select "5", a separator page will
be added after the 5th copy and after the 10th copy.
When the bypass tray is selected, be sure to select
the "Paper Type".
PRINTING A CARBON COPY (CARBON COPY)
This function prints an additional copy
of the print image on paper that is of the same size but from a
different paper tray.
For example, if carbon copy print is selected when plain paper
is loaded into tray 1 and colored paper is loaded into tray 2, a
print result similar to a carbon copy slip is obtained with a single
selection of the print command. If plain paper is loaded into tray
1 and recycled paper is loaded into tray 2 as necessary, selecting
Carbon Copy simultaneously prints one copy for presentation and
one copy as a duplicate.
This function is available in a Windows environment.
Windows
- Click the [Inserts] tab.
- Select [Carbon Copy] from "Inserts Option"and click the [Settings]
button.
- Select the tray for the first copy from "Top Copy", and
then select the tray for the carbon copy from "Carbon Copy".
When the bypass tray is selected, be sure to select
the "Paper Type".
TWO-SIDED PRINTING WITH SPECIFIC PAGES PRINTED ON THE FRONT SIDE
(CHAPTER INSERTS)
This function prints specific pages on the
front side of the paper.
When you specify a page (such as a chapter cover page) to
be printed on the front side of the paper, it is printed on the front
side of the next sheet even if it would normally be printed on the
reverse side of the paper.
Example: When pages 4 and 8 are specified as page settings.
(4 has a reverse side, and 3 and 8 are blank on the reverse
side.)
- This
function is available in a Windows environment.
- This function
can be used when the PCL6 printer driver is used.
Windows
- Click the [Layout] tab.
- Select the 2-Sided Printing.
For information on the "2-Sided Printing" setting, see "
2-SIDED PRINTING".
- Enter the page numbers of the initial pages of the chapters,
separating the numbers with commas.
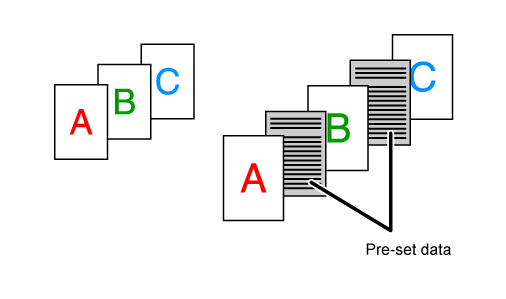
INSERT PRESET DATA BEFORE OR AFTER EACH PAGE (PAGE INTERLEAVE)
This function inserts a preset data item
into every page during printing.
You can easily create documents with opened page spread that
is made up of text on the left-hand page and a memo space on the
right-hand page.
- This
function is available in a Windows environment.
- This function
can be used when the PCL6 printer driver is used.
Windows
- Click the [Stamp] tab.
- Click the [Settings] button.
- Select [Page Interleave] from the "Printing Method".
- Set the overlay data to be inserted and set its insertion
position.
PRINT THE SAME IMAGE IN TILE PATTERN (REPEAT PRINT)
This function prints the same image in tile
pattern on a sheet. This is useful for producing name cards and
stickers.
- This
function is available in a Windows environment.
- This function
can be used when the PCL6 printer driver is used.
Windows
- Click the [Main] tab.
- Select the repeat count in "N-Up".
PRINTING PATTERN DATA (HIDDEN PATTERN PRINT)
This function prints pattern data such as
"DO NOT COPY" behind the print data.
If paper with pattern data is duplicated, the pattern data
emerges in the background, which will help to prevent information
from being leaked through unauthorized document copying.
- This
function is available in a Windows environment.
- This function
can be used when the PCL6 printer driver is used.
Windows
- Click the [Stamp] tab.
- Click the [Hidden Pattern] button.
- Configure the settings for hidden pattern printing and click
the [OK] button.
The hidden pattern printing function cannot be
used when "Print Mode" is set to [1200 dpi].
- "Hidden Pattern"
is a function provided for the purpose of deterring unauthorized
printing. It does not guarantee the prevention of information leakage.
- Text may
not be completely hidden on an output sheet with a pattern print
under certain machine conditions. In "Settings (administrator)",
select [Security Settings] → [Hidden Pattern Print Setting] → [Contrast] if this is
the
case.
- The hidden
pattern may not emerge on copies with certain types of devices or
under certain setting conditions used to copy an output sheet with
a pattern print.
- When the
color mode is set to [Black and White] or when it is set to [Automatic]
and the original is recognized as black and white, a black background
pattern is printed even if a cyan or magenta pattern is selected.
CHANGING THE RENDERING METHOD AND PRINTING JPEG IMAGES (USE DRIVER
TO RENDER JPEGS)
In some situations, a document containing
a JPEG image may not be printed correctly. This can be solved by
changing the way the JPEG image is rendered.
When you print an original containing JPEG images, this function
allows you to select whether the images are rendered in the printer
driver or the machine.
- This
function is available in a Windows environment.
- When images
are rendered in the printer driver, it may take time until the printing
is completed.
Windows
- Click the [Detailed Settings] tab.
- Click the [Other Settings] button.
- Click the [Use driver to render JPEGs] checkbox so that
 appears.
- Click the [OK] button.
MAXIMIZING THE PRINT AREA ON THE PAPER (PRINT AREA)
By maximizing the print area, you can print
on the full paper size.
This function is available in a Windows environment.
Even when the print area is maximized, edges may
be cut off.
Windows
- Click the [Detailed Settings] tab.
- Click the [Other Settings] button.
- Select [Maximum] from the "Printable Area".
- Click the [OK] button.
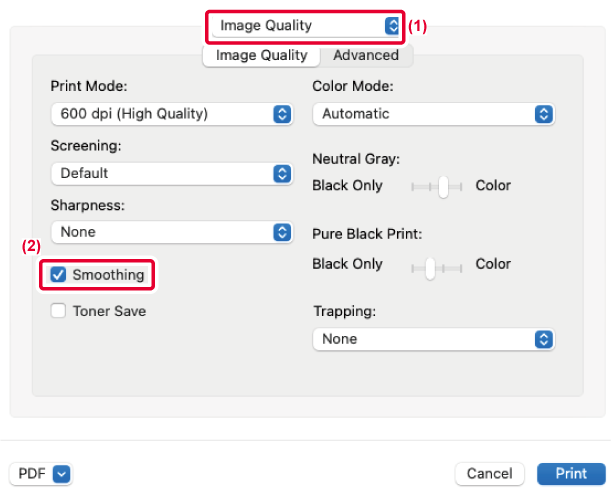
PRINTING AT AN ENHANCED RESOLUTION (SMOOTHING)
Resolution enhancement techniques (RETs)
are used to smoothen the outlines of images. The images are printed
at a digitally enhanced resolution.
Windows
- Click the [Image Quality] tab.
- Select the [Smoothing] checkbox so that
appears.
macOS
- Select [Image Quality].
In macOS 13 and macOS 14, [Image Quality] is located
under the "Printer Options" menu.
- Select the [Smoothing] checkbox so that
 appears.