ADDING A WATERMARK TO PRINTED PAGES (WATERMARK)
This function adds faint
shadow-like text as a watermark in the background of the printed
image. The size and angle of the watermark text can be adjusted.
The watermark text can be selected from the previously registered
text in the list. When necessary, you can enter text to create an
original watermark.
Windows
- Click the [Stamp] tab.
- Select [Watermark] from "Stamp" and click the [Settings]
button.
- Select the watermark to be used and click the [OK]
button.
Click the [Edit] button to select other detailed
settings.
If you want to create a new watermark, enter the
text of the watermark in the text box and click the [Add]
button.
macOS
- Select [Watermarks].
- Click the [Watermark] checkbox and configure watermark
settings.
- Configure detailed
watermark settings such as selection of the text.
- Adjust the size and
angle of the text by dragging the slide bar
 .
.
PRINTING AN IMAGE OVER THE PRINT DATA (IMAGE STAMP)
This function prints a bitmap or JPEG image
stored on your PC over the print data.
This function prints a frequently used image or an icon of
your own creation as if it is stamped on the print data. The size, position,
and angle of the image can be adjusted.
This function is available in a Windows environment.
Windows
- Click the [Stamp] tab.
- Select [Image Stamp] from "Stamp" and click the [Settings]
button.
- Select the image stamp to be used, and click the [OK]
button.
- If
an image stamp has already been stored, it can be selected from
the menu.
- If you have not stored
an image stamp, click the [Image File], select the file you wish
to use for the image stamp, and click the [Add] button.
REGISTERING A CUSTOM IMAGE
This function registers images used as custom
images from the printer driver to the machine.
- This
function is available in a Windows environment.
- This function
can be used when the PCL6 printer driver is used.
Windows
- Click the [Detailed Settings] tab.
- Click the [Custom Image Registration] button.
- Select the registration type and name of the custom image.
When [Custom stamp] is selected in "Registered Type", non-transparent
stamp image is registered. When [Custom watermark] is selected, transparent
watermark image is registered.
If you have attempted to store multiple pages of
data, only the first page will be stored.
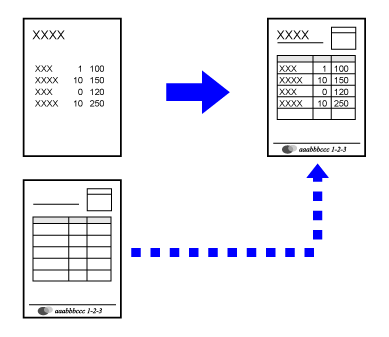
OVERLAY A FIXED FORM ON THE PRINT DATA (OVERLAYS)
This function overlays data on a fixed form
you have prepared.
By creating table rulings or a decorative frame in an application
different from that of the text file and registering the data as
an overlay file, an attractive print result can be easily obtained
without the need for complex manipulations.
This function is available in a Windows environment.
Windows
Creating an overlay file
- Open the driver properties window from the application
that is used for creating overlay data.
- Click the [Stamp] tab.
- Click the [Settings] button.
- Click the [New] button and specify the name and folder
to be used for the overlay file that you wish to create.
The file will be created when the settings are completed
and printing is started.
- When
printing is started, a confirmation message will appear. The overlay
file will not be created until the [Yes] button is clicked.
- When you
click the [Open] button, the existing overlay file is registered.
Printing with an overlay file
- Open the driver properties window from the application
that is used for printing with an overlay file.
- Click the [Stamp] tab.
- Select an overlay file.
A previously created or stored overlay file can be
selected from the menu.
ADDING THE NUMBER OF COPIES (COPIES STAMP)
You can add the number of copies to the
header or footer of the print data. You can also set a copies number
and print position.
This function is available in a Windows environment.
- Click the [Stamp] tab.
- Click the [Copies Stamp] button.
- Select the settings, and click the [OK] button.


.png)
.png)

