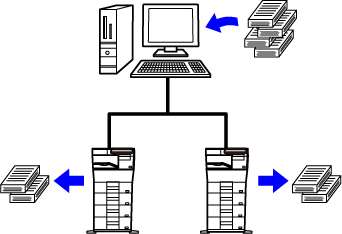
To use this function, two machines that can perform tandem printing are required.
Two machines connected to the same network are used to run a large print job in parallel.
This function reduces the printing time when you handle a large number of prints.
Example: Printing four sets of copies (2 set of copies are executed by the primary
unit and secondary unit each)
This function is available in a Windows environment.
To use the tandem print function, the IP address of the secondary unit must be registered
in the printer driver.
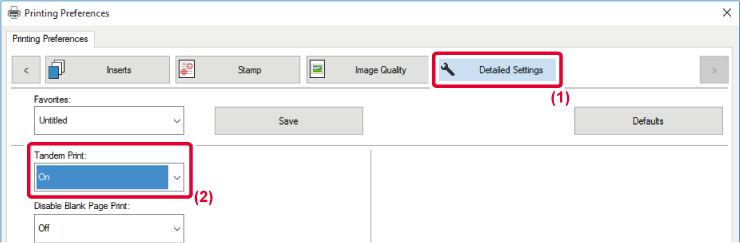
Windows
- Click the [Detailed Settings] tab.
- Select [On] in "Tandem Print".
The tandem print function can be used only when the printer driver has been installed
using "Custom Installation" with [LPR Direct Print (Specify Address/Auto Search)]
selected and with the [Yes] checkbox selected for "Do you want to use Tandem Print
function?".
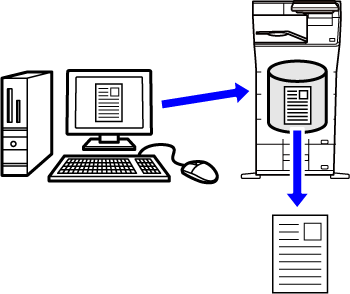
This function stores a print job as a file on the machine's local drive, allowing
the job to be printed from the touch panel when needed. The location for storing a
file can be selected to prevent the file from being mixed together with files of other
users.
- Hold Only
This setting is used to hold a print job on the machine's local drive without printing
it.
- Hold After Print
This setting is used to hold a print job on the machine's local drive after it is
printed.
- Sample Print
When a print job is sent to the machine, only the first set of copies is printed.
After checking the contents of the first set of copies, you can print the remaining
sets from the operation panel of the machine. This prevents the occurrence of excessive
misprints.
- For the procedure for printing files stored on the machine's local drive, see "FILE PRINTING" in "Document Filing".
- When printing from a PC, you can set a password (4 to 8 digits) to maintain the confidentiality
of information in a stored file. When a password is set, the password must be entered
to print data.
- [Document Filing] that can be set on the [Job Handling] tab can also be set on the
[Main] tab.
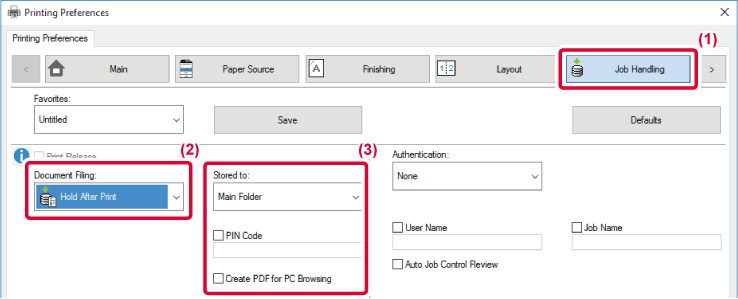
Windows
- Click the [Job Handling] tab.
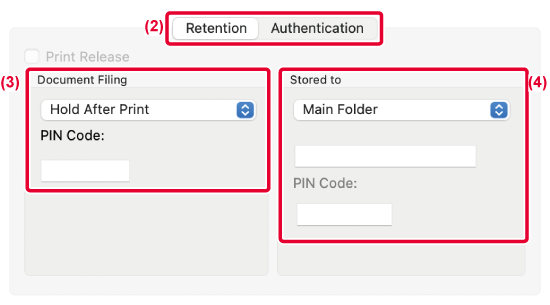
- Select the function from the "Document Filing".
- Select the folder for storing the file in "Stored to".
To enter a password (4 to 8 digit number), click the [PIN Code] checkbox so that the
checkmark appears.
To create a public PDF for PC browsing, select the [Create PDF for PC Browsing] checkbox
().
- When [Quick File] is selected, "Document Filing" will be set to [Hold After Print].
- When [Quick File] is selected, the password entered in "Document Filing" is cleared.
- If necessary, you can select the data format from CMYK and RGB for data to be stored
in the machine. Click the [Other Settings] button on the [Detailed Settings] tab and
select the format from "Rip Style".
- To store a file in a custom folder, you must first create the custom folder using
[Document Operations] in "Settings (administrator)" → [Document Filing]. If you have
set a password for the custom folder, enter the password (5 to 8 digit number) in
"PIN Code" on the stored to screen.
- When selecting [Get Folder Name] when changing the destination folder, the names of
folders already registered with the machine are displayed in the list.
macOS
- Select [Job Handling] from the "Printer Options".
- In macOS 12 and earlier, select [Job Handling].
- Select [Retention].
- Select how to save the print data in "Document Filing".
If necessary, you can enter a password (4 to 8-digit number).
- Select the folder to store the file in "Stored to".
If you selected [Custom Folder], enter the name of the custom folder where you want
to save the file.
- When [Quick File] is selected, "Document Filing" will be set to [Hold After Print].
- When [Quick File] is selected, the password entered in "Document Filing" is cleared.
- If necessary, you can select the data format from CMYK and RGB for data to be stored
in the machine. Select [Advanced1] in [Printer Features] and select the format from
"Rip Style".
- To store a file in a custom folder, you must first create the custom folder using
[Document Operations] in "Settings (administrator)" → [Document Filing]. If you have
set a password for the custom folder, enter the password (5 to 8 digit number) in
"PIN Code" on the folder selection screen.
When user authentication is enabled on the machine, all document filing (stored) print
jobs of the user who logs in are automatically printed. After all jobs are printed,
the stored jobs are deleted.
To use the Print All function, the following steps are necessary:
- In "Settings (administrator)", select [System Settings] → [Authentication Settings]
→ [Default Settings] and enable [Automatically print stored jobs after login].
- When executing document filing print, in addition to the user authentication information,
click on the "User Name" checkbox to enter a user name.
Using this function in a Windows environment:PRINTING IN A WINDOWS ENVIRONMENT
Using this function in a macOS environment:PRINTING IN A macOS ENVIRONMENT
Files with a password and files that are protected by the document filing function
of the machine will not be printed. Files in a folder (excluding My Folder) that has
a password will also not be printed.
- Select [Job Handling].
- After logging in to the machine, a confirmation message will appear, and then tap
the [OK] key.
The print files stored in the quick file folder, main folder, and custom folder will
be printed automatically and then deleted.