Specify a time at which a transmission or
broadcast transmission will automatically take place. Transmission
begins automatically at the specified time.
This function is helpful when you wish to perform reserved,
broadcast or other transmissions during your absence or at night
or other times when telephone rates are low.
For example, if it is set to print data received during the
day at 20:00, the received data will not be printed immediately, and
printing will begin automatically at 20:00.
.png)
 " position. If the main power switch is
in the “
" position. If the main power switch is
in the “
 "position at the specified time, transmission
will not take place.
"position at the specified time, transmission
will not take place.Place the original.
Place the original in the document feeder tray of the automatic document feeder, or on the document glass.Tap the mode display to switch to the initial screen of each mode.
CHANGING MODESSpecify the destination.
RETRIEVING A DESTINATION FROM AN ADDRESS BOOKTap the [Others] key, and tap the [Timer] key.
Tap [On] key.
Specify the date.

Specify the time (hour and minute) in 24-hour format.
After the settings are completed, tap and [Back] keys in sequence.
 to finely adjust the time.
Tap the [Start] key to start scanning of the original.
You can add a signature when sending a scanned
image. This allows the recipient to check your sender information
in the electronic signature.
Place the original.
Place the original in the document feeder tray of the automatic document feeder, or on the document glass.Tap the mode display to switch to the initial screen of E-mail mode.
CHANGING MODESSpecify the destination.
RETRIEVING A DESTINATION FROM AN ADDRESS BOOKTap the [Others] key, and tap the [Sign E-mail] key.
A checkmark appears on the icon.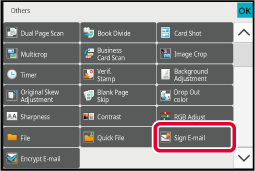
Tap the [Start] key to start scanning of the original.
You can encrypt the transmitted data to
strengthen security.
Place the original.
Place the original in the document feeder tray of the automatic document feeder, or on the document glass.Tap the mode display to switch to the initial screen of E-mail mode.
CHANGING MODESSpecify the destination.
RETRIEVING A DESTINATION FROM AN ADDRESS BOOK ) in "Settings (administrator)" - [System Settings]
→ [Security Settings] → [S/MIME Settings] → [Condition Settings] → [Encryption Settings],
addresses
without a user certificate cannot be selected. When the checkmark
is removed (
) in "Settings (administrator)" - [System Settings]
→ [Security Settings] → [S/MIME Settings] → [Condition Settings] → [Encryption Settings],
addresses
without a user certificate cannot be selected. When the checkmark
is removed (
 ), the data is sent without encryption.
Tap the [Others] key, and tap the [Encrypt E-mail] key.
A checkmark appears on the icon.
Tap the [Start] key to start scanning of the original.
Version 04a / bp90c80_usr_04a_us
