This section explains how to enter a destination from
the initial screen of basic mode.
SELECTING FAX MODE
The methods that can be
used to send a fax from the machine are described below. Select
the method that best suits your needs.
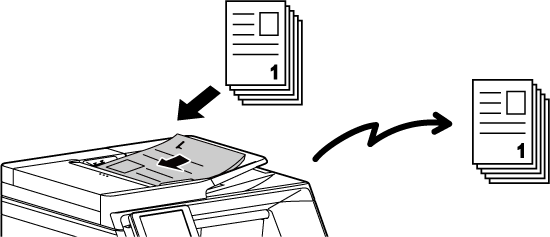
Use the automatic document feeder.
The originals will be scanned into memory and then transmitted
(memory transmission).
When multiple original sheets are placed in line idle state,
they will be sent in sequence from the scanned page in parallel
with the scanning process (Quick On Line Sending).
If transmission cannot begin immediately because the line
is in use, all pages will be scanned and stored in memory.
USING THE AUTOMATIC DOCUMENT FEEDER FOR TRANSMISSION
Storing
a fax job
If transmission cannot begin immediately because the line
is in use, all pages will be scanned and stored in memory. If you
want to attempt to send a fax while another job is in progress,
you can store the fax job. To check the stored fax job, display
the job status screen.
FAX JOBS
Place the original on the document glass.
USING THE DOCUMENT GLASS FOR TRANSMISSION
.png)
Send the fax in direct transmission mode. The original is transmitted
directly to the receiving fax machine without being scanned into
memory.
When direct transmission mode is used, transmission will begin
as soon as the transmission in progress is completed (ahead of any
previously reserved transmissions).
Tap the menu icon and then the [Communication Settings] key
to change the setting to direct transmission.
USING THE AUTOMATIC DOCUMENT FEEDER FOR FAXING IN DIRECT TX MODE
USING THE DOCUMENT GLASS TO SEND A FAX IN DIRECT TX MODE
If the line is busy when you send a fax,
transmission will be attempted again automatically after a preset
interval. This function only operates in memory transmission mode.
In direct transmission mode or manual transmission mode, the transmission
will be cancelled. Wait for a brief period and then try sending
the fax again.
If a communication error occurs or the other
fax machine does not answer the call within a preset period of time, transmission
will automatically be attempted again after a preset interval. This
function only operates in memory transmission mode.
This mode displays a destination confirmation
message when a fax is sent to prevent accidental transmission to
the wrong destination. Set it in setting mode. If a fax is sent
while this function is enabled, after tapping the [Start] key (or after
retyping the direct fax address when [Require Re-entry when Directly
Entering the Fax Destination]), the Destination List screen will
appear. After confirming the displayed destinations, tap the [OK]
key, then tap the [Enter for send] key to start sending.
With "Fax Dest. Confirmation Mode" enabled, and "Require Re-entry when Directly Entering
the Fax Destination" enabled
Tap the [OK] key to display the re-enter request message.
Re-enter the destination using the numeric keys and tap the
[OK] key.
If the re-entered destination is correct, tap the [+] key
to directly enter the next destination, and tap the [OK] key to
return to the basic screen.
If the re-entered destination is not correct, a message will
appear.
Tap the [OK] key and re-enter the destination.
Tap the [Start] key to display the destination you entered
on the Destination Confirmation screen. After confirming that the
destination is correct, tap the [Confirm Send] key to start loading
the original.
With
"Fax Dest. Confirmation Mode" enabled, and "Require Re-entry when Directly Entering
the Fax Destination" disabled
Tap the [Start] key to display entered destinations in
the destination confirmation screen. Check that the destinations
are correct, and tap the [Enter for send] key to start scanning of the
original.
 to enter the destination fax number to
be added.
to enter the destination fax number to
be added.A confirmation screen is displayed based on the method
used to specify the destination during the previous transmission.
Version 05a / bpc131wd_usr_05a_en
